


Learning The Notes On The Neck Pt. 2, Background and practice tips for learning sharps and flats on the neck |

|
|
|
|
Jan 29 2013, 09:04 PM

|
|
After covering all the “white notes,” no sharps or flats, on the guitar in our first lesson in this series, we are ready to expand into the realm of sharps and flats as we continue our work towards learning all the notes on the neck of the guitar.
If you missed the first lesson, or need a refresher, you can find it here: Learning The notes On The Neck Pt. 1 In this lesson, we’ll be identifying what sharps and flats are, how you can learn them across the neck of the guitar on each string, as well as diving into fun and productive exercises to help make sure you learn every note on the guitar and never forget them! So grab your axe, crank your amp and let’s get started! Sharps and Flats To begin this lesson, let’s take a look at exactly what exactly sharps and flats are, then we’ll work on finding them on the guitar and memorizing them across the neck. To make a sharp, you take any “white note” on the piano, with two exceptions E and B, and you raise it by a half-step (1 fret). So, as you can see in the example just below, if you take the note G, raise it by 1 fret (half-step), you then get the note G#. To make a flat, you take a note and lower it by a half-step (1 fret), with the exception of C and F, as in the example below where you have the note A, lowering it by a half-step to make the note Ab. Here are those examples in tab and notation. 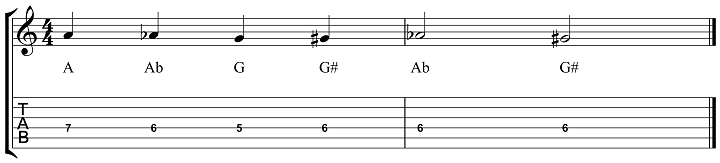 Notice that Ab and G# are the same notes on the guitar. This might be a bit confusing, as one note as two names, but it is meant to help identify key signatures and scale notes, which is a lesson for another time. But, for now, just know that if you lower A it becomes Ab, and if you raise G is becomes G#. Raising G never becomes Ab and lowering A never becomes G#. As an exercise, try finding all of the sharps and flats on a given string. Here is an example on the 6th string where you have F#, G#, A#, C# and D#.  Try playing up these notes and saying each one out loud to help you recognize their location on the fretboard. If you are going back down the string, switch to flats to learn to see those notes on the neck as well. So F#, G#, A#, C# and D# would become Gb, Ab, Bb, Db and Eb respectively. Once you have done this on the 6th string, as in the above example, take it to all the other 5 strings to work out the sharps and flats across the entire neck, one string at a time. As I mentioned earlier, there are two notes that don’t use sharps, B and E, and two notes that don’t use flats, C and F. This is because E and F, as well as B and C, are already a half-step apart. So, if you lower C by a half-step, it doesn’t become Cb, it becomes B. Same thing if you raise E by a half-step, it doesn’t become E#, it becomes F. Here is a quick guide to help you see how these notes work on the neck. 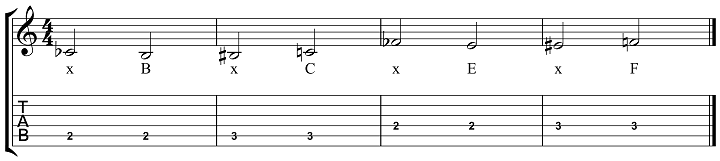 So just remember going forward that C and F don’t take flats, and E and B don’t take sharps. Memorizing the Lower Strings Now that we have a grasp on what sharps and flats are, and how they relate to the “white notes” of the piano that we learned in the previous lesson, you are ready to start finding and memorizing these notes on the neck of the guitar. To begin, it is a good idea to memorize the notes on the lower two strings. One, because this is where you would normally find the roots for any chord you are playing, so they are good to know. And two, because you will see with the next section of this article that knowing these two strings will allow you to learn all the rest of the notes on the neck in no time. So to begin, here are all the notes on the 6th string of the guitar. To practice both sharps and flats, say the sharps going up the string, and flats going down to be able to see both at the same time. And remember to say each note out loud as you play up and down the string to really get the most out of this exercise. 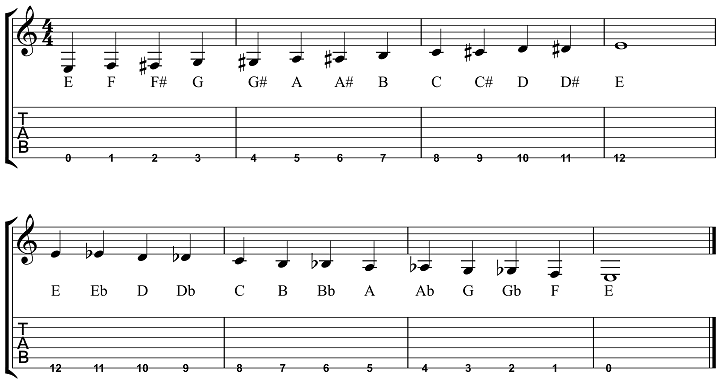 Here are the notes on the 5th string of the guitar. Again, practice saying the sharps going up and flats going down in order to practice both and see how they relate to each other on the neck.  Memorize these notes before moving to the next exercise. If you have already worked on the previous lesson and know the names of the “white notes” on the piano, then this won’t be too difficult as you are only adding a few extra notes to the ones you already know. Octave Location Trick The reason that we learn the lowest two strings first, is that you can use a simple trick to then learn all the rest of the notes on the neck, related them to the notes on the E and A strings that you already know. To begin, if you know the notes on the low E string, you already know the notes on the high E string, as they are the same. So that takes 2 of the 6 strings out of the way already. Then, you can take any note on the 6th string, add two frets and move two strings higher, and you get the same note. So, if you have an open E on the 6th string. You can add two frets, jump up to the 4th string and you get the same note, E. You can then repeat this technique to learn all the notes on the 4th string, relating the all to notes on the 6th string that you’ve already learned. Here is how that would look in tab and notation.  Octave_1.mp3 ( 771.76K )
Number of downloads: 609
Octave_1.mp3 ( 771.76K )
Number of downloads: 609 The same rule applies to the 5th string. Take any note on the A string, add two frets and jump up two strings to find the same note on the G string. Here is how that would look in tab and notation.
Octave_2.mp3 ( 682.98K )
Number of downloads: 516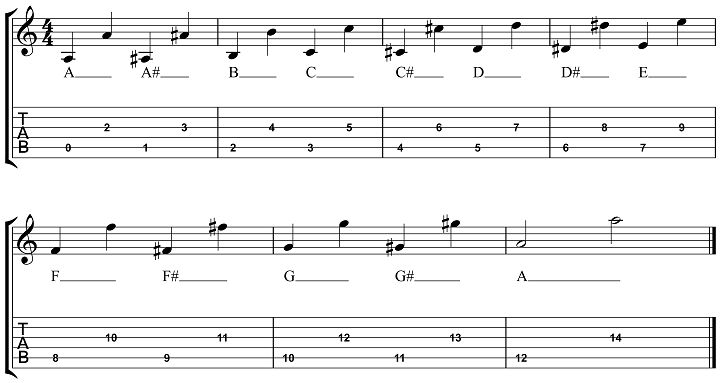 You can apply the same rule, with a slight twist, to notes on the 4th string as well. You still go two strings higher, up to the B string, but you add 3 frets this time to get the same note on the 2nd string as you have on the 4th string. Here is how that looks, with all the notes on the 4th string then found on the 2nd string by adding 3 frets and 2 strings to the lower note.
Octave_3.mp3 ( 672.57K )
Number of downloads: 530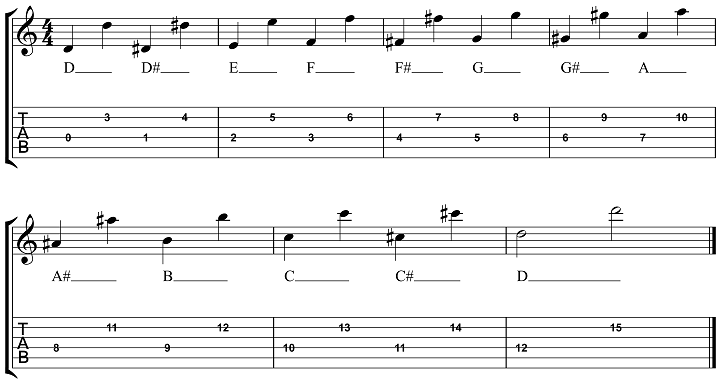 As you can see, if you have a good knowledge of the lower two strings, you can then use one easy to apply technique to find all the notes on the other 4 strings without having to learn or work on them separately. This is a great way to not only learn the notes on the neck, but to find any note on the fly. So when working on this exercise, make sure to get the skill down of finding the notes on the neck related to the lower 2 strings, rather than just memorizing the notes and moving on. This will allow you to find any note at any time on the guitar. Cool right!? Major Scales on Single Strings The next exercise will focus on playing one key, one scale, on one string at a time. We looked at this exercise in the previous lesson, which focused on the “white notes” of the piano, but now we’ll apply it to learning any/all notes on the guitar. To start, pick a scale or key that you want to work on. Then, find the lowest notes in that scale on the 6th string. In the example below, using the A major scale, the lowest possible note I can play from that scale on the 6th string is the note E. So we start there with this exercise. Then, you play up the scale from that low note, saying each note out loud to add an extra layer to your practice routine. Once you have done this ascending and descending on the 6th string, you can then repeat the same exercise across all 6 strings on the guitar. Here is how that would like with the A major scale across all 6 strings.
A_Major_1_String.mp3 ( 980.53K )
Number of downloads: 536 A_Major_Backing_Track_1.mp3 ( 497.88K )
Number of downloads: 684
A_Major_Backing_Track_2.mp3 ( 615.84K )
Number of downloads: 596
A_Major_Backing_Track_1.mp3 ( 497.88K )
Number of downloads: 684
A_Major_Backing_Track_2.mp3 ( 615.84K )
Number of downloads: 596It’s a tough exercise to do. But, by being able to see the notes across one string at a time, outside of vertical scale shapes, you are really testing your knowledge and solidifying these notes in your ears, under your fingers and in your mind. Naming Notes in Scales The last exercise we will look at uses scale fingerings to help you learn the different notes on the neck. In this exercise, you take any scale, such as the A major scale written out below, and you say the notes out loud as you play them on the guitar. Here is that A major scale to use as a starting point for this exercise.
A_Major_In_Position.mp3 ( 423.39K )
Number of downloads: 477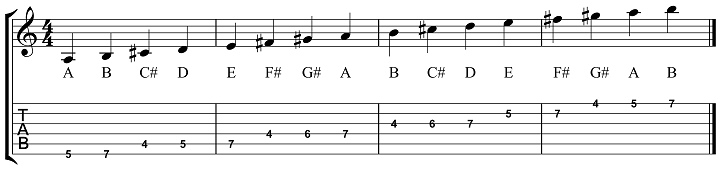 A_Major_Backing_Track_1.mp3 ( 497.88K )
Number of downloads: 684
A_Major_Backing_Track_2.mp3 ( 615.84K )
Number of downloads: 596
A_Major_Backing_Track_1.mp3 ( 497.88K )
Number of downloads: 684
A_Major_Backing_Track_2.mp3 ( 615.84K )
Number of downloads: 596Saying the names of the notes out loud allows you to work on scale fingerings, which are an important part of learning the guitar, while learning the names of the notes on the neck at the same time. You can also apply this technique to other melodic devices you are working on, such as arpeggios, modes, licks and patterns. The key is to be able to see and name any note from any scale, arp, lick etc. that you are playing at any given time. Try this exercise out without any time to begin, to make it easier to say each note. Then, when that becomes easy, add your metronome into the mix to take the exercise to the next level. In Conclusion As you can see, learning the “black key” notes on the guitar might seem like a tough task. But, with a few exercises and visualization techniques, you can build enjoyable and educational approaches to learning these notes on the neck in your daily practice routine. Related GMC lessons : * First Steps 4 : Note this well What do you think about these approaches and exercises? Do you have any questions? Share your thoughts below. -------------------- |
 |
 
|
|


|
|
|
|
Jan 30 2013, 01:01 PM

|
|
Thanks a lot for the lesson!
 Never though of this approach when learning the notes on the neck, it is very effective. -------------------- For GMC support please email support (at) guitarmasterclass.net
Check out my lessons and my instructor board. Check out my beginner guitar lessons course! ; Take a bass course now! |
|
|
|
|
|
|
|
|
Jan 30 2013, 01:16 PM

|
|
The octave tricks is absolutely awesome. Only, I call it the power chord trick haha :-D
--------------------  |
|
|
|
|

|
|
|
|
|
Jan 30 2013, 09:13 PM
|
|
Thanks guys, when learning notes on the neck I've needed all the tricks I can get over the years. These ones are definitely some of my faves.
-------------------- |
|
|
|
|


|
|
|
|
Feb 10 2013, 06:30 PM

|
|
Thank You !
This exercises and lessons is what i have been looking for - just did not know it myself  Great i found it now
|
|
|
|
|
|
|
|
|
|
Feb 10 2013, 06:46 PM
|
|
Glad you dug the exercises, they're fun and you get to learn the neck. Always a bonus!
-------------------- |
|
|
|
|
 
|
1 User(s) are reading this topic (1 Guests and 0 Anonymous Users)
0 Members:


