Printable Version of Topic
Click here to view this topic in its original format
GMC Forum _ GEAR & PRODUCTION _ New Colour For My Telecaster
Posted by: MirkoSchmidt Jul 31 2009, 12:44 PM
Hallo everybody,
last month i bought a fender tele (squier) on ebay. it looked very good on the pictured. A few days later the guitar came in a package, when i opened them i saw one of the worst guitars ever. the finish had a terrible colour. i cant see it and so i get the great idea, to make a new finish.
i polish the hole body, so now its naked, and i dont know what to do. How can i get a new finish on the guitar? I there any chacne to do it on my own?
sorry, for my bad english... hope you understand!
Posted by: Ivan Milenkovic Jul 31 2009, 05:20 PM
Here is some useful info:
1. If you own more than one guitar, pick out the one which is of least value to you, for example, the first electric guitar most people own when they are young, is something like a Replica Stratocaster, by makers such as Vintage, or Encore. These guitars are fairly cheap and it is not a great loss if you damage them.
2. Unless you have a spacious indoor area like a workshop available, you will be doing most of the work outside, so the best time is to wait until the late spring or early summer.
3. Strip down the guitar. Unwind your tuning pegs and remove the strings.
4. Get yourself a set of screwdrivers of various sizes, although it is likely you will only need 2 or 3 different sized screwdrivers. Also, find a box with partitions in it or a few small boxes in which you can store parts such as screws and knobs and tuning pegs. If it helps, you can label them.
5. With a screwdriver, remove the screws on the back of the guitar which attach the neck to the body, therefore removing the neck so you have the lone guitar body to work with.
6. Work your way around the scratch plate, removing the screws and placing them in one of the little boxes as appropriate, and remove the Jack plate cover.
7. Ensure you have access to a soldering iron, and know how to use it, or know someone who does who is willing to help out later on. Often in strat style guitars, the wires that attach the jack input to the pickups and pots (volume and tone dials) go through a hole drilled through the body, which means you will need to snip the wires in order to remove the scratchplate components and the input jack. The best thing to do is to have some sticky labels or coloured tape, and colour code the 2 wires to the 2 metal parts of the jack input to which they are soldered, then snip as close to the solder as you can, so you have the full lengths of wire intact.
8. There may be (well, there should be) a third wire, which acts simply as a ground wire, which goes from the pickups to the piece of metal in the back of the guitar to which 3 or 4 springs will be attached. You will need to have removed the plastic cover on the back of the guitar, and you will see it, label it with some tape is necessary, then cut it close to the solder. You should now be able to completely remove the scratchplate, complete with pickups, pots and all electrical parts still attached to it. Keep this section very safe from dust or static, just keep it in its own cardboard box with a closeable lid.
9. Remove all metal components from the wooden guitar body, labeling for future reference where necessary.
10. Have a plain guitar body; usually replica makes are coated in cheap acrylic paint. This takes considerable effort to remove, unless you (or your parents) possess a belt sander and or oscillating sander. You can clamp the guitar body down to a work bench, and use the belt sander with a medium grit sand belt to remove most of the acrylic in the flat areas such as on the front and back of the guitar, and the oscillating sander to work the more awkward areas such as the contours around the body. If when using the belt sander you make the surface of the wood slightly uneven, i.e. you make small 'steps' in the wood, do not attempt to even them out with the belt or oscillating sander, this will be done by hand later. Work carefully until you have removed as much of the acrylic as possible, whilst having as little contact with the wood itself as possible. Use the gun to heat the body and scrape the paint and finish off. This usually works quite well and is much safer than a sander (you wont change the shape of the body).
11. Get 3 pieces of sandpaper, a coarse grade ('50 grit') a medium grade ('100 - 120 grit') and a fine grade ('150-170 grit') Those numbers represent the size and density of sand/glass grains on the surface of the paper, 50grit being harsh and 150grit being very fine. Work over the entire body with the coarse grained paper, working to even out any steps or imperfections caused by the power sanders, and remove any remaining acrylic in places such as the arc of the cutaways.
12. Work over the entire body with the medium grit sandpaper to make sure all the contours flow properly, and finally with the fine grained sandpaper. This last bit of sanding should take at least 45 minutes to an hour, you must work over the body thoroughly with the fine grit paper, until you can brush off the dust, and run your fingertips over all the contours without even being able to feel the grain of the wood, let alone bumps or steps.
13. With a dry cloth, brush off all the dust, then take a high grit sandpaper and wet it down. Wet sanding removes any oil from fingers and also provide a better surface to paint. Gently rub down the guitar with the sandpaper and allow to dry. It should take about ten minutes and you are now ready for you base coat of paint.
14. Decide how you want to paint your guitar. When choosing your paints make sure you read the instructions carefully, you may need to apply a coat of wood primer.
15. With a clean paint brush apply the primer thinly and evenly, making brush strokes that follow the direction of the wood grain, or you may be lucky to find some spray-on primer that is easy to apply if you are good with spray paint. You can paint one side of the guitar at a time, allowing the first side to dry fully before starting on the other side, but you can also hang your guitar body or neck to the ceiling with some cotton thread trough the holes of the neck screws on the body or machine heads on the neck. Once fully dried, using the fine grit sand paper, very carefully rub the body just enough so the the raised bumps of the brush strokes are evened out. So once again you can rub your fingertips over the body and feel not even the tiniest of bumps.
16. Make sure you mask off the inside and where the neck attaches to the body. Use spray paint to achieve an even finish. As you spray on the paint, depress the spray button whilst spraying slightly away from the guitar, and moving the can steadily over the body, never depressing or releasing the button whilst pointing at the body. Always apply at least 2 coats of any one colours or you will just bore a hole into the wood that cannot grip the screw by its threads.
17. also use 2-3 coats of laquer to give the guitar a more finished look and to stop the paint from peeling You can also take the opportunity to make hardware adjustments, such as replacing pickups instead of sticking with the cheap single coils that invariably come fitted with replica models. If you want you can buy a new scratchplate, you may find that the original scratchplate no longer matches the colour scheme of the newly painted guitar, so you can get a replacement of a more suitable colour relatively cheaply. Make sure you get professional help and advice when you go about replacing electrical components.
[edit] Tips
* Search online for Conductive Shielding Paint to paint all of the inside cutaways with. This will provide shielding for the electronics and reduce hum. If the inside of the cutaways are already painted flat gray or black, Use a Multimeter set for ohms to see if the paint is conductive. If so, mask them off and do not paint over them with standard paint. To shield plastic pickguards and covers, cover their inside surfaces with copper tape.
* Skip the belt sander, orbital sanders, and sanding to remove the old finish. Sanding can rub old paint particles deep into the grain in places and leave behind the old finish in deep grained wood. Aside from leaving a poorly prepared surface, you are making quite a mess. So unless you want to be constantly looking over your shoulder for a flying skillet aimed in your direction, go pick out a paint stripper. The most powerful strippers will remove any surface coating, be careful handling them and follow directions. After you have removed the old finish, which you washed the stripper off with 3M scouring pad and water the wood grain will be slightly raised. Sand the surface with 220 grit, use a dry paint brush and tack cloth to remove all dust. You will start with a grain filler for grainy woods such as mahogany or ash, then sand with 320 grit. Finer grained woods start at step 2, a sanding sealer. If you are staining with a sanding sealer base, you must use varnish! Polyurethane will peel! Make sure you approach your finish as a system. Do not mix brands or types of paint.*Speak to your friends, particularly anyone you know who does Art at college or something, as they can offer valuable advice when it comes to designing the new paint job.
* If you really mess up on painting the first time round you can just sand it down and start over, just be aware of how much time you will need.
* This can be a lengthy process, make sure that you prepare for circumstances, for example, if you have to leave the project for a while after you have already started it, you don't want to come back to a disassembled half painted guitar, and have no idea where all the screws and components go. Make sure you label, organize, colour code and sort out whatever will be necessary for you to remember how it all goes back together
* If you have resources, experiment and practice, cut a piece of scrap wood into the shape of your guitar and try out different designs and techniques.
* Once finished show it off to your friends! Take it to band practice, play it at your next gig, whatever.
* If you want to go a little further you can do some more advanced stuff, like using a router to change the shape of the contours, or make the tips of the cutaways sharp rather than rounded, cut sections out of the body, so long as you don't cut so much that it detracts from the structural integrity of the body, you don't want it to bend and warp as you tighten the strings.
* While in its disassembled state, take the opportunity to clean your guitar, dab the pickup heads with blu-tack to remove the fine metallic dust that accumulates each time you strum, rub any grime off the pickguard with a cloth slightly damp with warm water and maybe a little soap. Apply some fretboard polish to the fingerboard.
* There are limitless ways of painting your guitar. One way is to use spray-on Crackle glaze, with a gold undercoat, and a stoney blue colour on top. The result will be a sort of light marine blue colour, with cracks in it that showed the gold underneath. How heavily you spray the crackle glaze determines the size and amount of cracks, so you can vary it. Finish it off by spraying a few coats of shiny (not matte) lacquer over it to seal it. Another design option is to paint the under coat in a bright race car red colour, and once dry, use narrow strips of masking tape, to make 'racing stripes' around the body, by say, carefully laying the masking tape along the edge following the contours, maybe with and extra 1 or 2 lines next to it, then spraying an over coat of black, and peeling off the tape, to reveal red stripes going around the guitar. Masking and stenciling is a very good way to create unique designs, that can be as simple or as intricate as you want, so long as you don't go too over the top.
* To get an even finish whilst spraying and drying the guitar, you can lay it on top of 3 or 4 glass marbles, or untwist a wire coat hanger and put it through one of the holes that the neck bolts go through, then hang it from a washing line.
* You should use car or indoor/outdoor use spraypaint. The 98 cent can of spraypaint looks convincing, but is less uniform. A glossy paint does not leave as much paint dust, and will look much better.
* be sure to sand between finishing coats. It may seem as if it will dull the gloss but it will offer a more protective shine.
[edit] Warnings
* Acrylic dust will wreak havoc with your lungs as well as your eyes, make sure you get the right protection - Wrap around safety glasses and one of those white respiratory masks, they can be bought for a reasonable price at any hardware/DIY store.
* Use common sense, if you use power tools, make sure you know how to use them, if not, get someone with more experience, like your dad or the professional dude who lives across the street.
* You need more than a respiratory mask you actually need a particle mask to be safe!!!
[edit] Things You'll Need
* Set of Screwdrivers
* lots of sandpaper, in fine, medium and coarse grade
* if available, a hand-held belt sander and oscillating sander
* A decent amount of time
* some cloths (for wiping down, brushing off etc)
* paints of your choice and some finishing laquer
* wood primer (if required by specific type of paint)
* Safety goggles
* dust mask
* old newspaper to cover surfaces like tabletops when painting
* Soldering Iron
* series of boxes in which you can store and organise the guitar components to make reassembly easier
* A good weather forecast or a large well ventilated workspace
* clamps (preferably with rubber grips to protect the wood)
* stable work bench to clamp the guitar to whilst sanding and such.
Posted by: Jesse Jul 31 2009, 05:42 PM
holy camoly Ivan!
Posted by: kaznie_NL Jul 31 2009, 08:32 PM
Ivan, if you wrote that yourself, get yourself checked, if not, great job 
Posted by: Ivan Milenkovic Jul 31 2009, 09:09 PM
I have to disappoint you it was copy/paste  But useful one I hope
Posted by: sted Aug 1 2009, 08:14 AM
Blimey Ivan! the poor lads gonna be reading that for weeks!! Great post man!
Posted by: MirkoSchmidt Aug 1 2009, 11:46 AM
wow, many thanks ivan!
i`ll try to undestand it. my english isnt very well.
ok, i`ll post a picture of the guitar when its done!
Posted by: Keilnoth Aug 1 2009, 12:18 PM
Your English is good enough. Don't worry. We have read much worst. 
Posted by: Ivan Milenkovic Aug 1 2009, 02:15 PM

i`ll try to undestand it. my english isnt very well.
ok, i`ll post a picture of the guitar when its done!
Good english man, don't worry. Take is slowly, like a spunge
Posted by: Muris Varajic Aug 1 2009, 03:30 PM
How about me?
Posted by: MirkoSchmidt Aug 1 2009, 10:40 PM
lol,. ok thanks... tomorrow in the morning i`ll strip down the guitar...
Posted by: MirkoSchmidt Aug 4 2009, 05:58 PM
hallo,
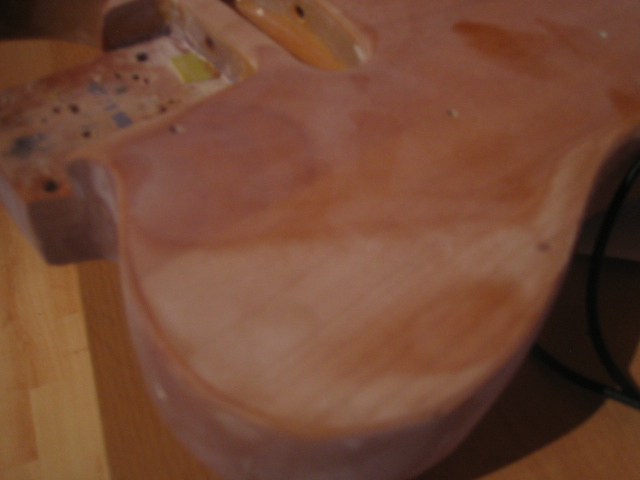
i erase the finish from the guitar, but now i can see two differnt colours. im not sure what to do. when i eraise the finish i can see the wood, but if i grinding a few seconds more the wood gets more bright or clear.
i make a picture of that, can somebody told me what is going on there?
is the brighter one too deep or should i erase the finish like that everywhere?
Its my first try, maybe it wasnt my best idea to work on the guitar... not sure if i can play there anytime...
Posted by: MirkoSchmidt Aug 5 2009, 09:20 AM
help!!! 
Posted by: mhskeide Aug 5 2009, 10:43 PM
Just bumping the post so it pops up on the mainpage. Unfortunately I dunno whats wrong, but I`m about to start the same job myself, so would Like to know whats happening to yours if somebody can tell.,
Posted by: Hans-Erik Aug 5 2009, 11:54 PM
Did you use a sanding block when you sanded it down? If not, go buy one/make one. Its just a piece of wood/plastic block that you wrap the sandingpaper on, to make the sanded surface more even. Looks like, looking at the picture, that you didn't have that.
Go to a paintshop and ask for some spray primer, clear coat and your color of choise. At the same time ask them how to do it, im sure you will get lots of good tips.
I painted my old Ibanez RG some years ago, and i did like this:
Sanding (coarse->medium)
Primer
Sanding (medium)
Primer
Sanding (fine)
Main Color - 4-5 layers (sanded very fine between them)
Sanding (fine->very fine/watersanding)
Clear Coating
Sanding (watersanding)
Results were pretty good, dont have any pictures though 
Posted by: eddie!!!! Nov 13 2009, 04:24 AM
dude, i will try to make this easy for you to understand.
1. Go to www.reranch.com
2. click on basic refinishing.
3. click on reranch 101. this will tell you everything you need to know.
4. i am not sure if they ship internationally, but if they do they have everything you need.
I actually just finished painting my first guitar. i made a black tele and it turned out great.
JUST REMEMBER- what ever happens is ok, because your mistakes can be sanded out. and if you have any questions i will be glad to help you out.
Powered by Invision Power Board (http://www.invisionboard.com)
© Invision Power Services (http://www.invisionpower.com)