Setting Up And First Steps In Reaper, What is Reaper, installation and initial setup |
|
|
|
|
|
| Sep 25 2007, 02:10 AM |
|
Getting Started
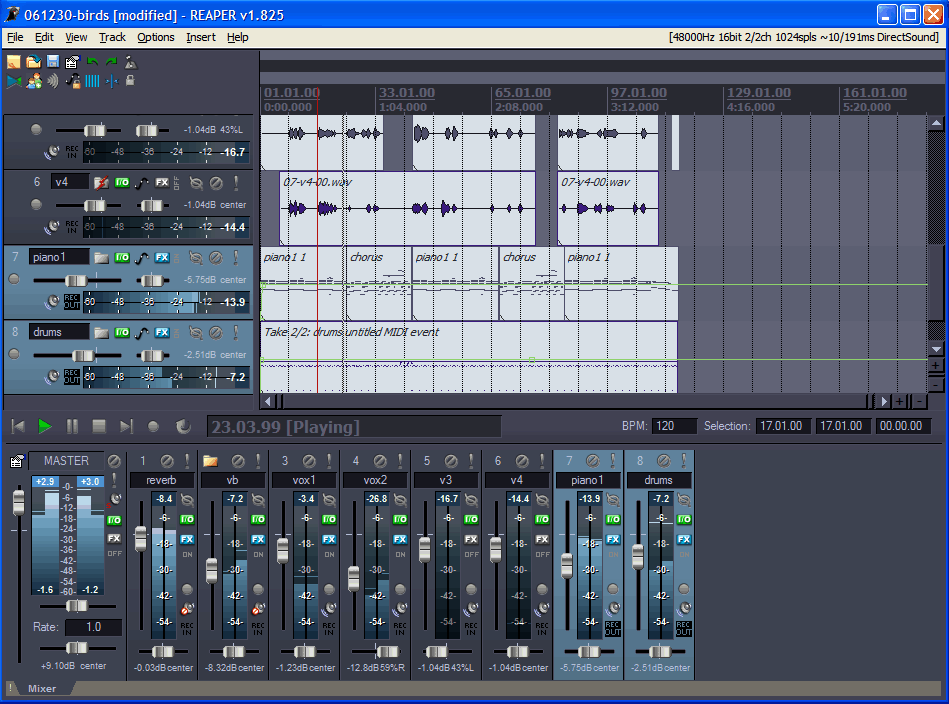
Introduction  Reaper with Stealth Colour scheme - Image courtesy of Cuckos. Most of us have probably wanted to record our own music. In the past we may have done this either by going in to a recording studio or by using a porta-studio. Nowadays we have another option and that is to use software and a computer. This is where Reaper comes in; with Reaper you can multi-track record and manipulate sequences of musical notes and events – it’s an audio and midi (musical instruments digital interface) sequencer that includes a sophisticated virtual mixing console, editing facilities and the ability to render – or write – your recording to compact disc. On this sub-forum we’re going to focus on Reaper. There are many other sequencers to chose from – freeware, shareware and full commercial packages – so why have I chosen to focus on Reaper? First it is available as an unlimited, unrestricted download from the developers at http://reaper.fm/index.php. So you can evaluate it at little cost to yourself. Second, if you do like the product then a non-commercial license should be bought (currently about $40 plus taxes), most commercial sequencers cost many times this. Third, despite the price Reaper is a full professional sequencer with some advanced features including a 64bit audio engine and multiprocessor capability; flexible routing that is more powerful then any other sequencer; support for most hardware; ripple editing; it can read and write most media formats including WAV, AIFF, OGG, FLAC; the installer is small – just over 2MB and can fit on a USB stick! All in all it is a great sequencer in my opinion. Computer specification and set up Please Note - at time of writing (September 2007) Reaper is pc only. A Mac version is expected soon though. So what do you need to run Reaper? According to the developers the minimum requirements are a 500mhz processor, Windows 98/ME/2000/XP/Vista with 128MB RAM, 10MB free disk space, 800x600 in 256 colors or higher, Windows compatible sound hardware. The recommended system specifications are: Multiple processors, Windows 2000/XP/Vista with 1GB RAM, >1GB free disk space, 1280x1024 in 16.7M colors, ASIO sound drivers. As a personal note I would recommend that any pc used as a sequencer should have as much RAM as possible, a fast processor and at least one fast hard drive and a midi interface. I would also say that an ASIO2 compliant audio card/interface is essential. If you want to push the boot out a 64 bit quad core processor, as much RAM as you can, Win XP64, several hard drives (a system disc, and one for music) and a multi-screen set up. If possible you should try to keep your music computer for music and no other purpose (no games, internet, MS Office etc). If you only have one computer then you should consider a multiple boot system; one boot as your normal environment, games, web brouser etc and a separate one for music only. Before you install Reaper de-fragment your hard disc and install your audio card/interface. Download and double click on the installation file and then follow Cuckos’ instructions to install Reaper – I’m using the V2 beta by the way. Once Reaper has installed Close the install program and then choose No to the option to run Reaper. Setting up some software preferences Now start Reaper by double clicking on the Reaper icon on your desktop. Before we do anything else it’s best to set up the audio. On the menu bar at the top of the Reaper screen select Options>Preferences>Audio>Device and, if you installed an ASIO2 compliant audio card/interface, select it in the drop down Audio System box. If you haven’t got an ASIO2 option and you did install ASIO drivers then chances are we need to troubleshoot your installation. If you don’t have an ASIO2 compliant card choose one of the other options. If your audio card has multiple ins and outs then you can set the input and output range next. If you don’t like the names that Reaper assigns to your inputs and outputs (it defaults to the name of the respective channels of the audio hardware that is installed) you can change them now. I find that Shure SM58 mic means a whole lot more to me than HDSP9652ADAT 1 so I've changed the default accordingly. (I use an RME HDSP9652 audio card setup with 64 channels of adat but channel one on my configuration is always a Shure 58 mic.) To change the names (called aliasing) choose Options>Preferences>Audio> and tick the ‘input (and/or output) channel aliasing option. Now click on the Edit Names button and when the channel name aliasing box appears double click on the Channel Names to edit them one by one. Click on OK to return to the Preferences box and then click on Apply and OK to close the box. I’d now suggest that you test your ASIO configuration. Next we should set up midi. Go to Options>Preferences>Audio>Midi Devices. Then select in turn all the midi devices that you might want to use. When you select a device right click it and choose Enabled. When you’ve finished click OK to close the Preferences box. The final item we’re going to setup for now are the VST Plugins. These are the software instruments and effects that you may have and Reaper comes with some pre-installed. We’ll talk about VSTs and VSTIs and so on in another thread. You need to tell Reaper where you have installed your VST Plugins. Choose Options>Preferences>Plugins>VST. Then click the Add button and specify the location/s of the folder/s where you installed your VST Plugins. If your plugs in are in more then one folder (mine are) then you will need to click Add to specify each new location. Press Apply and OK when you’re finished. If you’re forgetful like me don’t worry. Reaper will look in all the sub-folders contained within a folder that you specify. I’m so forgetful that I know some of my plugins are on my ‘K’ hard drive and so all I do is specify that drive and leave Reaper to do the hard work. The downside of this is it’s a big drive so Reaper takes a little longer to check for plugins when I start her up. That extra 15 seconds is the price I pay for being forgetful! Coming up - how to set up a project template. Hardware and software tweaks for music pcs. Cheers, Tony EDIT - decided not to talk about actual soundcards as that's more of a matter of personal preference but if anyone wants to discuss then feel free to set up a thread. This post has been edited by tonymiro: Sep 26 2007, 07:05 PM -------------------- Get your music professionally mastered by anl AES registered Mastering Engineer. Contact me for Audio Mastering Services and Advice and visit our website www.miromastering.com
Be friends on facebook with us here. We use professional, mastering grade hardware in our mastering studo. Our hardware includes: Cranesong Avocet II Monitor Controller, Dangerous Music Liasion Insert Hardware Router, ATC SCM Pro Monitors, Lavry Black DA11, Prism Orpheus ADC/DAC, Gyratec Gyraf XIV Parallel Passive Mastering EQ, Great River MAQ 2NV Mastering EQ, Kush Clariphonic Parallel EQ Shelf, Maselec MLA-2 Mastering Compressor, API 2500 Mastering Compressor, Eventide Eclipse Reverb/Echo. |
|
|
||
1 User(s) are reading this topic (1 Guests and 0 Anonymous Users)
0 Members:


