Printable Version of Topic
Click here to view this topic in its original format
GMC Forum _ Ivan Milenkovic _ Video Production Blog
Posted by: Ivan Milenkovic Jun 17 2011, 09:40 AM
Hey guys, I'm opening this topic and plan to write info about how to create successful videos on your own. I'll include some cool tips and tricks that will hopefully help you to achieve better video quality.
There are several areas that I could write about:
- Gear/Equipment
- Recording/Capturing
- Editing
- Finalizing
- Encoding/Rendering
- Uploading
These are all technical details, and the most important one - Creative part - is being left out. As always - idea is most important thing, so the things here can only help you form your vision better. The better the vision, the better the creation.
GEAR
Gear can cost a lot, and like with other similar jobs "How much money - that much music" rule apply. You just cannot achieve the same results with 150$ camera as you would with professional lightning and 5000$ camera, but you can try to emulate that, and hope for the best.
While we on the topic of cameras, there are 3 main categories that are important to mention:
1. Web cams
2. Consumer camcorders
3. Prosumer camcorders
4. Professional camcorders
The fourth option is a lot more expensive, and will be briefly mentioned, while we will have the biggest interest in two first (cheapest) categories.
Web Cams:
The first category are webcams. These cams are simple in design, have little sensor, and small lens. With the advances of technology, most webcams today will put out HD resolution. However, most of them will be fake, so only get famous brands like Logitech, or test the webcams thoroughly, otherwise you might end up with lower resolution that is being stretched out on HD frame.
Another problem with webcams is that they have small lens. The bigger the lens - more light can come onto the chip. So try to choose the one with physically biggest lens, and hope for the best.
Advantage of webcams is that they are cheap, and they are usually connected through USB2 standard, which means you can buy several and connect them all onto computer, without the need of separate interface.
Example of a 99$ webcam with 1080p recording capability: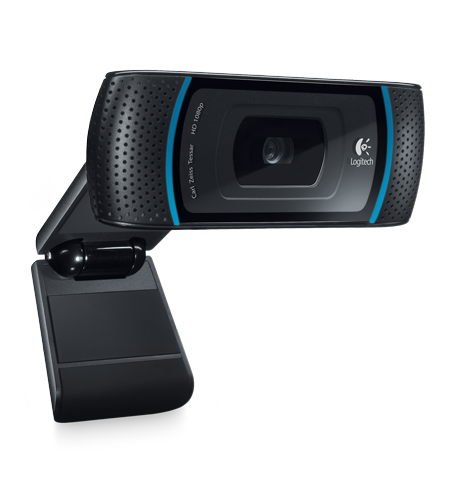
Consumer camcorders:
Video camera and video recorded integrated into one device produce camcorder. This means that you can capture and record video without the need of external equipment, which is convenient way to work.
Consumer category doesn't feature too much options for adjusting picture parameters, and have only one CMOS chip, which is the biggest reason these devices are in the consumer range. Devices that feature 3 chips (one per color) are belonging to prosumer market, and their price is usually 2x higher. Since consumer ones are the cheapest ones, we will stick to those as the ones that are of the most interest.
There are several categories of these devices, but with the technology advance, most important for use are HD camcorders. MiniDV ones are outdated today because of their lower resolution. HD camcorders usually put out 720p or 1080p resolution, although it is best to buy 1080p one, because of the long usability.
CMOS (MOS) Chip Chips dictate the price of camcorders. CMOS chips are today used technology and CCD chips are outdated. It's the chip that captures the light and turns it into electrical signals. The bigger the chip, more expensive the camera will be. CMOS chips today range from 0.3MPix to 4-5 MPix in better HD consumer cams. Most of consumer HD cams do NOT have native HD CMOS chip resolution. Instead they strech out the resolution of a chip to match the HD output that you will get. Be very cautious what you buy, and always try to read the manual. Sony and Panasonic manufacturers are brands that state very accurate information in the manuals, and thankfully, they can be all found online. Effective video resolution is the information you need, and it should be at least 1920x1080 pixels (~2.08MPix). These cams have native HD chips, and while others also put out HD, their sensors will be smaller and the picture detail and handling in low light conditions will be noticeable worse.
The number of pixels on an image sensor is not the only factor influencing the quality of the video captured. The physical size of the sensor (pixel cells) matters as well. Larger image sensors can capture more light than smaller ones, even if they have fewer pixels. That's because, while fewer in number, these pixels are larger and thus able to capture more light. This is why you'll see camcorders advertise not only the number of pixels on an image sensor, but the size of the sensor itself (usually in fractions of an inch). This factor is so important that it some camcorders with a larger image sensor (with even less pixels) are better than camcorders with smalled sensor (and more pixels). Numbers can vary tho, and price dictates these numbers. Usually the chip resolutions and dimensions are getting higher each year, so in 2010 we had models with 1/6 or 1/5 of an inch, in 2011 chips grew bigger to 1/4 etc. (Effective video) resolutions vary from 0.8 on very cheap models to 2.5 on an entry level "native HD" zone).
Lenses on these devices on cheaper models are usually made by manufacturer, although some manufacturers use third party lenses (for example Sony features Carl Zeiss optical components which guarantee better picture quality and geometry). It's always good to consider models with third party (specialized) optics.
Features on cameras are not that important, although it is very important to be able to manually adjust at least white balance, focus and exposure. Other important features are optical picture stabilization and optical zoom. If your use of camcorder is tripod-based, optical stabilization can be skipped (although camcorder can be non-useful for other purposes, which is not considered a good option). Technology today is so advanced that most cameras have face detection, smile detection, built-in editing/custom playback options with background music, fully automatic ambience adjustments etc..
Media Storage of a modern digital camcorder is either memory card or integrated hard disk. Hard disk option is good because of the large storage capacity, although the price of the camera rise a lot, and memory cards are cheap, replaceable and more compatible. This is why memory card camcorder is a better choice. Writing on a hard disk also cuts down battery time. Be aware tho, that SD memory cards are your best and cheapest option.
Codecs used for compressing the video material is today either HDV or AVCHD, with AVCHD being dominant in today's consumer devices. Both of these are not ideal for editing, and HDV maybe slightly better choice, but when it comes to choosing the camcoder, this shouldn't be the most important factor - intermediary codecs for editing are there for solving this problem.
Connections are not that important, although HDMI out and separate audio outs are important to have. USB cable is there for transferring already recorded material from memory card or HD, and it is not that important if you have memory cards (it's faster to get memory card reader for PC). HDMI is for streaming video and audio, but in order to capture it you will need separate HD capture card for PC (more on this soon).
Conclusion: As for consumer range, best way to go is with full HD 1920x1080 @ 60 or 50 interlaced frames. Devices should record on SD memory cards, should have manual white balance, focus, exposure, optical zoom and optical image stabilization options, and compress to a AVCHD codec. Other features may vary, for example you might want to check with manufacturer if the camcorded has limiter on the microphone preamp so you can record live shows without clipping.
Important thing to consider when buying is the price. If you see an HD cam from unknown manufacturer that is half the cost of other similar devices, be very careful. Usually these cams "imitate" full HD resolution by stretching out (interpolating) the resolution from a much smaller resolution chip. Chip dictates the price of a cam, so because of this it is cheaper. The picture will be poor quality tho, specially in low light conditions.
Panasonic entry-level HD cam with native HD 1MOS chip. LCD screen is reversed on the picture
to be continued...
Posted by: Cosmin Lupu Jun 17 2011, 09:59 AM
Awesome mate!! I'll be following this thread very carefully 
Posted by: Ben Higgins Jun 17 2011, 10:30 AM

You've already got great video quality
 You should check out my older videos if you want to see low quality
Posted by: Cosmin Lupu Jun 17 2011, 10:33 AM
You should check out my older videos if you want to see low quality Well, I just wanna improve
I'm that kind of guy that thinks he'll study 'till he's with one foot in the grave 
Posted by: quadrium Jun 17 2011, 12:08 PM
Awesome thread Ivan! I'll be following this thread also
Posted by: Todd Simpson Jun 17 2011, 12:22 PM
Great thread idea! Can't wait! 
Posted by: Sinisa Cekic Jun 23 2011, 10:14 PM
This shouldn't be interesting for me anymore, but it should be up to date
Posted by: Todd Simpson Jun 26 2011, 05:59 PM
This is a killer thread. Is this in the Wiki?
Posted by: Fran Jun 29 2011, 04:22 PM
Excellent stuff! This is going straight into our wiki now 
Posted by: Ivan Milenkovic Jul 31 2011, 09:41 AM
Prosumer camcorders:
These types of camcorders are something that I will go just briefly and mention couple of important things for everyone to know about. Usually you can find these camcorders look like an ordrinary camcorder, although some of them are starting to have bigger lenses, and as something that a TV reporter would use, for example this JVC prosumer cam:
example of a JVC prosumer camcorder with 3CCD chips
Price range: There is no definite price range for these devices, but I would stick to a rough estimate of 500-1800USD for prosumer models. Bare in mind that there is no hard line in definition to what a prosumer or professional model is, so it's just a rough estimation based on a quality of the device, it's reputation in work, price, features etc..
3 CCD and 3MOS Feature: Usually prosumer models will have 3CCD chips or 3CMOS chips available. When using 3 chips instead of one, every chip can process one color at a time (red, green and blue), so the color definition and clarity of image is much better. Prosumer and professional camcorders usually had 3CCD chips, and it is still regarded as a very good solution if you need high performance, and good color definition. However, with the advance of technology: better chips (CMOS), better color filters, better lenses etc.. - single chip camcorders are able to catch up with the performance. There are already prosumer single CMOS chip cams that cost less, but offer very similar quality as 3CCD chips, and there are (of course) 3MOS chips that offer superior performance to both 3CCD and 1MOS solutions.
difference between 1 and 3 chips
3D Feature: As of recently, camcorders of this price range offer 3D recording and playback feature as a part of a global 3D trend. 3D "vision" is being achieved with the extension that goes in the front of the camcorder. Sometimes cams will have the extension by default, sometimes (in order to cut the initial product pricing) the extension is being sold separately (while camcorder still has the 3D function only disabled until connecting the extension).
Panasonic-STD750 prosumer camcorder with 3D capability and 3MOS chips
Conclusion: Camcorders of prosumer price range are very interesting if you have a budget for them. The represent sort of a middle ground between consumer and professional equipment, so you can find features from both categories in them, under an affordable price. If you have the money, a model from this category would definitely be my recommendation because these devices are made with quality in mind. 3D and 3Chip technologies are sensitive, and manufacturers tend to use the best technology and build quality they got in order to create these models, so it's a sure bet for anyone looking to invest in a piece of gear that will have good performance, and good lasting and built quality.
Posted by: Ivan Milenkovic Aug 18 2011, 11:31 AM
Professional camcorders:
Professional range of camcorders is hi-end range for the market. All the best technologies are built into these devices. All the professional camcorders feature the 3 chips, better noise, color and light filters, most of the cameras have these filters doubled. Processing power is bigger, built quality is better. These devices are often used in field so it's very important that they are sturdy and function properly, with heavy grip handles and shoulder rests.
Lenses are also bigger, often from a third party manufacturer, and users usually have the ability to manually adjust zoom and focus via lens rings.
Price ranges vary a lot, but I would say you can find a decent new professional camcorder starting from 1500$ and going up.
Most important features that are making a distinction from prosumer products are the ones that are needed for professional video production:
- Progressive scan shooting at 1080/24P and 30P (faster processing and chips mean that these cams can put out 1080 resolution at 24/30 progressive full HD frames - instead of interlaced/halved frames with consumer or prosumer cams). In combination with better filters and 3 chips can bring out the colors and create the feel of a "film look" straight from the cam.
- DVCAM recording (most of these cameras record on DV tapes, which offer greater quality and compatibility with non linear video editing software and hardware systems which are used in professional studios). However, most of modern pro cams offer parallel recording to internal memory (which they often have), and memory cards.
- Timecode support (In professional video production, SMPTE timecode are used for synchronization and time logging, and these cameras offer various SMPTE timecode formats)
- XLR balanced audio inputs (for every professional video production, pro audio connectors are a must, so these cameras include XLR balanced connectors for connecting to professional gear with increased cable lengths)
Inner view of a HDR-FX1000 professional Sony Handycam camcorder
Conclusion: Professional camcorders are indeed top of the line, not only in video production, but in general - they are technology marbles. They are extremely sophisticated devices with delicate top-of-the-line technology built in, and it goes with a price. In general, these cameras on steroids are for serious professional purposes. When big budget production is running - malfunction or low quality would cost a lot more than a device itself. For every other purpose, other cheaper models will do the job just fine.
Posted by: Adrian Figallo Aug 24 2011, 03:18 AM
this is a very interesting blog man, i will save it read it later.
Posted by: Ivan Milenkovic Sep 7 2011, 02:53 PM
For the next chapter, we will be discussing the topic of lightning and how it affects our footage. While many amateur photographers and videographers try to get the best camera available, not many think about lightning that much. Lightning conditions are crucial for getting the best picture or video quality available. First thing we will talk about is white balance.
White Balance: on cameras is a set of values that helps them adjust colors so they look realistic. You probably sometimes tried to take a picture and colors didn't quite match up. Well, it's because of the white balance settings didn't match with color temperature of the frame. Bare in mind that white balance affects only colors, it doesn't affect brightness, exposure, contrast or other parameters of the image.
same shot taken with 3 different WB settings: warm, moderate and cool, each corresponding to different color temperatures
Our eyes have evolved to adjust to these color temperatures automatically, so we see white always as white. You perhaps noticed that when you hold one eye shut and one eye open for a longer time, there image will appear a bit different, being more bluish on the closed eye. Cameras on the other hand do not have this ability (although with advances in technology modern cameras do have ability to adapt to different lighting conditions to some extent). We need to tell the camera exactly what is the light temperature in the frame so it can adapt the colors and record them realistically.
The important value for color balance is of course color temperature. It is graded in Kelvins (K) Every light source emits light waves, and the hotter the source, more energy it emits through the light, shorter is the wavelength, and the brighter (more blue) the light becomes. Most video cameras have automatic white balance settings settings, or you can calibrate a custom one, based on a neutral white or gray spot in the frame. Here are some important light sources with corresponding temperatures (white balance values for the camera).
Color Temperature Light Source
1000-2000 K Candlelight
2500-3500 K Tungsten Bulb (household variety)
3000-4000 K Sunrise/Sunset (clear sky)
4000-5000 K Fluorescent Lamps
5000-5500 K Electronic Flash
5000-6500 K Daylight with Clear Sky (sun overhead)
6500-8000 K Moderately Overcast Sky
9000-10000 K Shade or Heavily Overcast Sky
Why is this so important for us if we want to create videos? Well, lightning IS one of the most important things you need in order to create a good quality video, and it's usually not the cameras that cost so much in professional studios - it's the lightning gear. In the next section we will be talking about different light sources, their prices and temperatures, so you can determine what would be the best solution for your recording purposes.
to be continued..
Posted by: Todd Simpson Sep 7 2011, 03:07 PM
Another great post in this series! Very informative stuff. Thanks Ivan!
Posted by: Ivan Milenkovic Sep 9 2011, 08:26 AM
Thanks a lot Todd. More material coming soon
Posted by: Sinisa Cekic Nov 1 2011, 03:56 AM
Nice Ivan, keep it up buddy !
Posted by: Ivan Milenkovic Nov 20 2011, 03:50 PM
On to the story of lightning systems:
Lights are extremely important when filming. No matter if you have big or small studio, lights represent major investment if you want to have good quality recording. People often thing that cameras and audio mixing desks are most expensive gear pieces in studios. Wrong. Lightning gear and lightning mixing desks are usually the most expensive gear pieces in the studio, and their setup also requires biggest investments (separate power handling and filtering gear, ceiling platforms, ramps, stands etc) and formidable crew to run and maintain.
It all depends on the purpose, but the bottom line is: without decent light - there is no decent recording. No matter if you run a home amateur studio or full blown Hollywood production - recording subject must be properly and evenly lit so that the camera can pickup all the light particles needed and convert it into healthy pixels without noise we see on screen.
For the sake of the article, I will create 3 basic categories of lightning systems, based on their usage:
1. Amateur
2. Semi-professional
3. Professional
Most of the article content will be reserved for amateur systems, but I will write about semi-pro and pro systems too for the sake of knowing what else is out there. It is good to know how professional lightning systems work, so you can try to emulate it with amateur systems, and create decent results even on a low budget.
Amateur lightning systems:
These are the systems that require lowest budget. If we run a small studio and want to record some videos, lightning gear is usually not on the top of the "to-buy" list. All amateur lightning systems category is based on solutions that are not directly intended for video recording, but with some knowledge and DIY skills they can be transformed into video lightning equipment.
When we talk about recording a video, we talk about continuous lightning. Light needs to be turned on all the time. First problem is light source's operating temperature (not to be mistaken with light temperature in "K" values, for white balance adjustments). This is the actual heat radiated from the light body itself. Some lights will have very low temperature, some will have very hot. In every case, it's very important to be extremely careful when handling lightning equipment, and always take care of the precautions against fire.
Cheapest and most frequent light sources you can find are Incadescent lights. The incandescent light bulb, incandescent lamp or incandescent light globe makes light by heating a metal filament wire to a high temperature until it glows. The hot filament is protected from air by a glass bulb that is filled with inert gas or evacuated. Tungsten metal filament is often used in standard light bulbs with air within the bulb, and halogen gas is often used inside the bulb to enable operating on higher temperatures without cutting down the operating life span.
There are two basic versions of these bulbs that you can find in almost any store, and their price will usually be the lowest. These are the light sources most amateur videographers start with:
Example of Incadescent regular bulb:
Example of Halogen tubular bulb: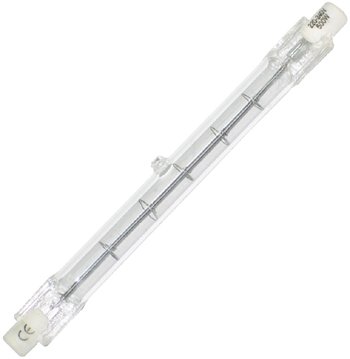
These light bulbs are the cheapest because they have been in use for long time, and mass produced. This doesn't mean they are the best. Slowly, they are being removed from production and use because they have low energy efficiency and high heat generation (and who knows what else). But, for amateur lightning system, these two light bulbs are still the first step.
Today, industry is changing in favor of fluorescent lightning. A fluorescent lamp or fluorescent tube is a gas-discharge lamp that uses electricity to excite mercury vapor. The excited mercury atoms produce short-wave ultraviolet light that then causes a phosphor to fluoresce, producing visible light. A fluorescent lamp converts electrical power into useful light more efficiently than an incandescent lamp. Lower energy cost typically offsets the higher initial cost of the lamp. The lamp fixture is more costly because it requires a ballast to regulate the current through the lamp.
While larger fluorescent lamps have been mostly used in commercial or institutional buildings, the compact fluorescent lamp is now available in the same popular sizes as incandescents and is used as an energy-saving alternative in homes. They are still more expensive then regular incadescent lights, but while the initial cost is a a bit bigger, they last longer and have big energy efficiency.
Examples of commercial fluorescent lamps:
Examples of home version compact fluorescent lamps:
These 4 categories will represent the basic bulbs used in amateur lightning systems. In the next article I will talk about in what way they are used, about stands, power they generate, pros and cons of each of these etc. Stay tuned!
Posted by: Ivan Milenkovic Nov 21 2011, 02:12 PM
Now that we have covered basic bulbs needed for our lightning setup, let's see how to make a setup!
Light bodies for home use:
First setup that an amateur videographer will use is probably a lamp or a fixture for home usage. There are of course numerous lamps out there, and depending on their position they can be categorized into:
- Floor lamps
- Table lamps
- Ceiling lamps
Very same categories will be used for our video production purposes. All three of these have certain function when it comes to lightning the subject, but in general, it's best to keep light sources as high as possible, so they don't cast any shadows that can be seen on the video (the higher the light, the closer the shadow is to the floor).
Here are some usual examples of these light bodies: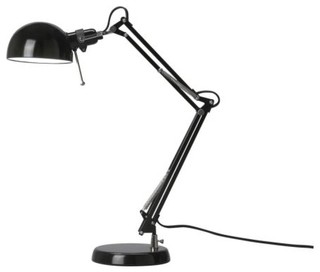

examples of basic table lamps with a stand and clamp (can be used with tungsten incadescent or compact fluorescent bulbs)
example of a floor lamp with 2 incadescent halogen bulbs, one high wattage, and one low wattage on the side
basic ceiling low wattage lightning body with multiple spot lights that accept tungsten incadescent or compact fluorescent bulbs
Light bodies for industrial/commercial use:
* There are various different light bodies, but the one that is most popular is definitely halogen work light, because it's very cheap, and you can find it in any bigger store. It accepts high wattage halogen bulbs and it very popular on various sites where there is need for lots of light.
Here are three basic shapes of these lights:
single 500W halogen work light with tripod high stand
single 500W halogen work light with floor stand
twin 500W halogen work light with mini tripod stand
* Second important category that is gaining in popularity in recent years is LED work light. It uses LED diodes, has very low power consumption, and high color temperature (~7200K), which gives it very distinctive blue and white glare. This light radiates almost no heat.
120 LED Twin Headed Rechargeable Work Light On Tripod
What to do with these lights?
Some of these basic examples will probably be found in homes, garages in one form or another, so for initial experimenting, you can use whatever you can find. Be creative and point all the lights that you can to the subject. The more light to the subject the better. If you are recording some equipment (like a guitar, various gear pieces etc..) always make sure that there are no reflections on the camera, as this can look very unpleasant. Depending on what you record, you need to create basic setup (more words on that later).
When color temperatures don't match:
The problem is that home lightning is usually too weak for video recordings, so if you have plenty of these lights, it's best to turn them all on. Having different bulbs, halogen, tungsten, or fluorescent, or daylight will all have different temperatures, so in those cases it's best to use auto white balance settings, or (if possible) determine yourself what color temperature is dominant in the screen, so you can manually find the correct WB value yourself. You can use your eye as a guide and practice a bit.
What light is the best?
None of these lights are perfect. Fluorescent light bulbs in homes are usually too weak, tungsten ones are also weak, and halogen work lights radiate lots of heat. However, last ones are the brightest, so if your budget is limited, if you have air conditioning, and take some precautions against fire hazards, they are good choice for a beginning amateur videographer. LED lamps are not that suitable for video production, because they have high temperature, and will need lots of WB adjustments, but they are great choice for amateur field video production, because they can operate on batteries, and offer decent amount of light, while practically radiating no heat. They are not as bright as halogen work lights, so roughly where you need 2 halogen lights, you will need 3 of these LED ones.
Posted by: Sinisa Cekic Nov 21 2011, 02:26 PM
Great explanation Ivan, still this topic is very valuable to me!
Posted by: Ivan Milenkovic Nov 21 2011, 02:52 PM
Thanks my friend, I hope it helps.
Posted by: Ivan Milenkovic Dec 21 2011, 02:00 PM
Semi-Professional Light Kits:
These light kits are made for studio work, radiate little heat and create soft shadows. Usually these kits are also made to be transportable in compact form, so smaller TV or video crews can carry them on field with ease. Their price range can vary, but you can find some pieces from roughly 50$ and up. On of the cheapest light kits are fluorescent ones, and they include:
- stand
- softbox/umbrella
- bulb socket
Stands
As far as stands go, we have 3 basic shapes in this category:
Single Light Stand:
T Bar Light Stand:
Oblique Light Stand:
All these shapes can have specific function, but in general, you will want most of your lightning sources to be closer to the ceiling then floor, and this is why stands are so important. Light sources emit light from above. Single light stand is great for beginning semi-pro videographer, T-Bar stand is good if you want to set multiple sources on one stand, and oblique light stand is great for places where you need greater accessibility or place the light source directly above the object.
Softbox vs. Umbrella
With the right training, a good photographer can use either of these devices to obtain the results they desire. For a beginner, a basic understanding of how light works should be obtained before tackling the subject.
Softboxes
When it comes to lighting, softboxes can offer you the most (and best) control and most uniform lighting. Multiple shapes are available, ranging from your standard rectangular or square to octagonal. They are double diffused, producing softer light than your other lighting options. Softboxes are more effective at reducing shadows, and can be used with brighter lighting (unlike with other methods, where too much light can wash out your photos).
However, softboxes are the most expensive option. In most cases, they are also hard to setup (especially when compared to umbrellas and brolly boxes), making use of them on location difficult. Quick setup softboxes are available, but the standard assembly softboxes offer you more versatility.
Umbrellas
There are two different types of umbrellas that you can use for photography: reflective and shoot through. Either option you choose, there are two large incentives for using umbrellas: they are the cheapest lighting modification option, and extremely easy to transport and setup. They produce a soft look, and the light falls nicely onto your background.
Umbrellas are also the most difficult to control and produce the most spill. If you use too much light with them, unlike with softboxes, you will wash out some elements of your photos. Also, if you are not extremely careful, you will get a small black center in the catch light in your subject’s eyes.
Brolly Boxes
A newcomer to the market is the brolly box. This item combines the quick assembly of the umbrella with some of the advantages of a softbox. A typical brolly box will have an outer white lining for shoot through lighting, with an inner black lining that fits around the head of your light to contain and eliminate spill. Used correctly, they can produce results similar to a softbox of the same size. Additionally, brolly boxes are as easy and convenient to setup and breakdown as an umbrella, and only slightly more expensive.
Brolly boxes generally have more light output than softboxes, but are not as robust as they offer less diffusion and cannot handle as much lighting. If used too far away from your subject, your light fall off will greatly diminish.
Lightning Kit Bulb Holders/Sockets:
3 forms that appear more frequently are single, dual and multiple bulb sockets. They mount on the stand and are capable of providing enough power for continuous time. Usually made for studio use, these sockets are more robust then regular ones that you can find at home or on work lights.
Single and Dual bulb holders with integrated umbrella holder:

Standard four Lamp Holder without any addons:
FAQ Section:
- What lightning kit is best for me?
That depends on the function. If you just started with your studio, the usual 3-point lightning setup will require at least two stands with single bulbs, two umbrellas/softboxes, and one smaller key light (preferably on a mini stand too). There are many economy lightning kits that have this in mind, so you can buy some of them relatively cheap. Here are examples of these kits, sold with the bags for easy transport:
Cowboy Studio Cheap Lightning Kit (~60$)
3-point Kit with muslin backdrop and stands (~130$)
2400W 3-piece lightning kit with reflective umbrellas (~150$)
- How big space do I need for this setup?
Bigger is better, but size creates other acoustic-related problems. So a proper balance must be found. As with many other things, always measure twice before buying anything. You should have enough space to have your entire object in-frame, have room camera stand, key light, fill light, and background light. All these stands will create obstacles in the room, so try to leave yourself couple of free corners for your gear, and to be able to walk through studio without needing to displace anything.
- Can I make some of these lamps myself to save some money?
Yes, but be careful about your investment, calculate the costs and work hours with the final result. There is a reason why this gear costs so much (and some of them are really cheap). Factory-made sockets and stands are more sturdy, and flexible then DIY ones, and DIY projects can often cost more then mass-produced factory kits (specially if you buy some tools for the job).
Posted by: Sinisa Cekic Dec 21 2011, 09:39 PM
Another great article Ivan,I enjoyed reading this !
Posted by: Ivan Milenkovic Dec 21 2011, 10:37 PM
Thanks my friend
Posted by: Bushybrows Dec 22 2011, 03:06 AM
This is great, this knowledge will certainly help me with my videos. At the moment, they suck haha. Thank again.
Posted by: Ivan Milenkovic Dec 22 2011, 05:42 PM
Take your time, and stay tuned. We still haven't touched the "red button"
Powered by Invision Power Board (http://www.invisionboard.com)
© Invision Power Services (http://www.invisionpower.com)