Printable Version of Topic
Click here to view this topic in its original format
GMC Forum _ GEAR & PRODUCTION _ My Amp Building Journey
Posted by: Andrew Cockburn Aug 14 2007, 07:49 AM
Hi All,
Some of you will probably have seen my posts pestering MickeM and Tonymirro endlessly about the finer points of Amplifier knowledge and terminology. Yes, I am on a quest for tube tone - I have been convinced that there is more than Line 6 and I am setting out to find it.
I was pondering Carvin and Bogner, Marshall and Vox when I saw http://www.guitarmasterclass.net/guitar_forum/index.php?s=&showtopic=4772&view=findpost&p=50646post on the forum - AdamB put up a picture of a tube Amp he had made ... then it hit me, why couldn't I do the same? (Thanks for the inspiration Adam, and your Amp looks incredibly cool!).
So with that goal in mind, I am going to build an amp, maybe several, until I get the sound I want. I have a lot of experience in electronics (built all sorts of gadgets as a kid) but I have absolutely no experience with tubes and tube circuits, althouthg I do understand the physics of them.
Research
I have been looking around the net and have found a lot of websites that sell kits, but I wanted a bit more than that - I wanted to understand how it all worked and maybe tweak things a little to get the sound I have in my head. Adam pointed me to 18watt.com - they have a number of projects on the go, their first design was an 18 watt arshall like tube amp. I had a look around but found the website a little hard to navigate, didn't really want a Marshall sound and was generally uninspired by it all. After some more searching, I happened upon http://AX84.com. A really cool website with a very active community. Over the last 10 years they have designed a prototype tube amp (the P1), along with many variants, and are now on a grander work of prividing a library of reference designs consisting of Pre and Power amps you can mix and match. I liked the site and decided to build one of their simple designs - the simplest have just a couple of tubes and a few tens of components, but building a tube circuit can be tricky and I wanted an easy place to start.
The Amp For Me
Part of what I wanted was to explore the different sounds out there. I have zero tube amp experience. None, NADA. I don't know Marshall Brown from HiGain from Vintage from a Vox - so this is a huge learning curve for me. I have had some good advice from Mike and Tony and know that:
1) Tube Amps are loud
2) they have to be played fairly hard to get all of the tube benefits.
A 35 watt amp with an efficient speaker at 10 feet can rival a jet plane landing for decibels, so something that you can play high enough to get the right sound yet record and practice with needs to be pretty small indeed. The AX84 P1 is a 5 watt design based on a 12ax7 double triode for the preamp and an EL84 for the power amp stage. I loooked at it initially, but although it was simple, it was basically a crunch type of amp, and I am looking for something higher gain, although not monstrously high.
The P1 has a couple of variants, the Extreme, and the High Octane. High Octane is a more complex build but has an EL34 or 6V6 power tube, a 3 stage preamp with cathode follower which makes it a high gain amp. The Extreme still only has 2 preamp stages like the P1 but does benefit from an EL34 or 6V6 power tube. This was appealing as I like the voicing of an EL34 based amp but would also like to experiment with 6V6 - normally hard to do as to exchange tubes you need to re-bias which needs knowledge of the workings of the circuits. The Extreme also keeps the simplicity of the P1, but can be upgraded to be more like the Hi Octane if I need more gain.
So, my choice was made, and I ordered the parts this weekend. I got a kit and a pre-drilled chassis, since my metalwork is dire. I also upgraded to a better output transformer and a variable bias option so I can easily swap power tubes. It has cost me around $300 so far, and counting ...
The Speaker
What little research I did on the internet seemed to point to the Celestion Alnico Blue speaker being the holy grail - they were used extensively in Vox amps for a while where they gained their reputation. Not cheap at $250 a pop, but I am doing this to get tone, not necessarily to save money so it seemed worth it.
Other Bits and Pieces
I'll need something to put all of this in, and I am looking into building a combo cabinet - unfortunately my woodworking skills also totally suck, but maybe this is a chance to learn some other stuff and do it right, I'll think about that some more. I could get a nice tweed style combo cab ready made for about $300 - could probably build it for 75 - 100. Still thinking about this.
Some Links
http://ax84.com
http://annex.ax84.com/media/ax84_m325.pdf
A couple of soundclips, http://annex.ax84.com/media/ax84_m267.mp3and http://annex.ax84.com/media/ax84_m262.mp3 (next sound clips will be from the one I built!)
That's the end of my first update - if there is interest I'll keep the story running 
Posted by: shredmandan Aug 14 2007, 08:26 AM
Looks like that would be a fun experiment to do Andrew. Have you decided which one you would like to build?If you think of it a tube amp for $200.00 US isnt bad at all,even if the speaker is weak you can always just buy a new one.Let us know what you decide and how it goes if you order one.
Posted by: tonymiro Aug 14 2007, 08:52 AM
Well I don't regard it as pestering Andrew - more great banter  .
.
One bit quickly - (I'll try to come back to you about your Q regarding speakers tomorrow - just back from a 12 hour stint at the beach and so am a bit knackered) - beware the quality of components.
It's possibly a bit simplistic but if you use cheap grade components you will build noise into your circuit however good the paper design. Not just for the tubes but for all of it. You might also want to seriously think about separating out and isolating the pre and power sections - there's years wortth of argument in hifi that if you don't you will build residual noise (for want of a better description) into the amp/s. Further, particularly for a hand built amp - good soldering is important. I'm rubbish at soldering and would advocate that anyone who has never soldered/is out of practice does a few dummy circuits before letting themselves loose on expensive parts  .
.
Apart from 18amp.com might also be worth looking at http://www.torresamps.com/ and - more widely for a really good in-depth view on http://www.amptone.com/.
Cheers,
Tony
btw - really looking forward to following your progress on this thread . Best of luck.
Posted by: Andrew Cockburn Aug 14 2007, 08:55 AM
 Have you decided which one you would like to build?If you think of it a tube amp for $200.00 US isnt bad at all,even if the speaker is weak you can always just buy a new one.Let us know what you decide and how it goes if you order one.
Hi Shredman - the post escaped before I finished it - some more details in there now
Being able to mix match and upgrade is a big part of the appeal to this, you are right!
Posted by: The Uncreator Aug 14 2007, 09:00 AM
Great, maybe ill build my own amp someday to
Cant wait to see how your quest goes Sir Cockburn!!
Thast right, i said quest, Big Whoop, wanna fight about it?
/End family guy reference
Posted by: Andrew Cockburn Aug 14 2007, 09:08 AM
Yeah, I agree. I was going to source it all myself and get good quality stuff, but then I noticed that the guy that rund AX84.com also sells kits for some of the amps - he basically puts in a kit what he would use to build it himself, so I am pretty comfortable about that aspect of it, a guy called Chris Hurley - we emailed back and forth several times and he helped me out on the AX84 forum before I bought the kit, very helpful guy.
.I'll think about the preamp power amp thing for sure- I think the recomended construction is all on one board, but it wouldn;t be hard to separate it out.
Although I am useless at metalwork and woodwork, my soldering is fortunately pretty competent, so that is the piece that worries me the least, but thanks for the warning
Thanks - good info there!
Thast right, i said quest, Big Whoop, wanna fight about it?
Nope, not me! In fact I think its a great idea to dignify this activity with the epithet of Quest, I thank you!
All of which leads to the obvious question, what do I call my amp when it is done? Its only 5 watss so it doesn't really deserve a name of power, maybe I should call it "The Fart Box" or similar, and save the names of power for my ultimate amp, yea, I speak only of the amp that will come after this, the one and only, the all playing all distorting .... phew, got carried away a bit there, sorry ...
Posted by: shredmandan Aug 14 2007, 09:29 AM
I agree with what some of you have said above.There is alot to take into consideration.Ofcorse soildering is VERY important i have found that out when installing a humbucker in my guitar.I kept wondering why it had such a weak sound and finally found out i had just did a bad soilder,im not very good either at it but it;s something you just have to practice to master.
As for the parts same deal they will make a huge difference pending on what you use.If i was the one buying an amp to make i would first look up all the parts needed to build and research them all.Find out any detail and difference in quality i could see.
One thing you need to make sure the box amp is built in is very good quality and is sealed very well.All the other things (parts) you can replace but if the box isn't good your stuck with nothing to build in.  I would be allover Ebay right now looking at prices for parts
  .I am an Ebay junkie and have found all my stuf on there cheaper than any store.I would think it would be a better place to buy your tubes and upgrade parts.
You have done this once before Andrew so im sure you learned afew things since then.Just do alot of research that way you built a amp that you will always be satisfied with and remember the cheapest route isnt always the best but,there are deals to be found especially in bulk and used buys.
Good Luck Keep us posted
Posted by: JVM Aug 14 2007, 10:33 AM
Very interested andrew, I'm still going to be building my guitar, so maybe I'll do an amp as well 8) Keep us posted.
Posted by: MickeM Aug 14 2007, 04:33 PM
that's so funny because I've been discussing with another amp kit guy since before the summer, then he went for vacation and returned yesterday and I placed the order.It will ship from abroad so it will take some time before I get it I suspect.
Mine is "smaller", it's 1/2 W with a British flavor mod and I will make it a combo. The speaker will be a Vox-kind 12" Cheramic.
I will see how your blog works out Andrew, I may open a thread aswell about my build or post a "how to" afterwards. Only hope it will work or it will be a "how not to"
I'll come back with all the details on which kit and speaker in a few weeks when I get started
Posted by: Andrew Cockburn Aug 14 2007, 06:52 PM
that's so funny because I've been discussing with another amp kit guy since before the summer, then he went for vacation and returned yesterday and I placed the order.Cool! We might have to Pester Kris for an Amp building forum for the three of us
Posted by: Smikey2006 Aug 14 2007, 10:43 PM
Ahh id love to do this I've always wanted to just build all my own gear but it sounded too time consuming and expensive . Let me know how long this whole indever takes i might wanna try it someday.
Posted by: Hardtail Aug 16 2007, 12:53 PM
Andrew, sounds like your going to have a lot of fun! Lemme lend some advice:
- The maximum plate dissipation of an EL84 is 12 watts.
- The maximum plate dissipation of an EL34 is 25 watts.
- The maximum plate dissipation of an 6V6 and 6L6 is about 30 watts.
The above information will come into play later.
Tone vs. Gain
ALOT of people confuse gain with tone. To make things quick and simple I will explain it this way. Gain comes from your Preamp tubes. Tone comes from your power tubes. The flavor of your tone is altered by everything from your guitar, amp circuitry, effects, etc. A 12AX7 based preamp breaks up (or saturates as the pro's call it) exactly the same in every amp. Your unique tone will come from the power tubes and circuitry.
What does this all mean? This means if you want a tone that is unique and saturates smoothly you will want to drive your power amps into saturation (and not ride the gain nob like a noob ). Find someone with a low wattage (5 to 15 watts) tube amp and leave the "Gain" relatively low and crank the volume to 10. You will most likely hear a distortion so sweet and butter smooth you'd think you were in tone heaven.
SRV did this on the clean channel of his Fender Twin Reverb by cranking the volume insanely loud.
SO... coming back to plate dissipation in power tubes. If you don't drive the wattage into the power tube hard enough it won't saturate correctly and all your distortion will come from the preamp tubes. In that case you might as well just play a solid state amp with a decent preamp section.
Most power tubes don't saturate well until you reach at least 70% max plate dissipation. So I would think in my humble opinion that a 5 watt EL34 based amp won't give you that unique tone you may be looking for because you're hardly pushing the power tube at all. Just some food for thought.
Example Amp design calculations:
Fender Blues junior (rated 15 watts) - 2 EL84 - 12 watts x 2 = 24 watts - 24 watts * .70 = 16.8 watts
Fender Hot Rod Deluxe (rated 40 watts) - 2 6L6 - 30 watts x 2 = 60 watts - 60 watts * .70 = 42 watts
Marshall TSL 100 (rated 100 watts) - 4 EL34 - 25 watts x 4 = 100 watts - 100 watts * .70 = 70 watts
The TSL100 is biased lower for the EL34's to work but is designed to move 100 watts because you can always swap up to 6V6's with a professional rebias.
I could go on but I think you see what I am saying. If you want to run a single EL34 or 6V6 I'd plan for more than 5 watts. Cheers and GOOD Luck! I can't wait to see the finished product!
- Hardtail
Posted by: JVM Aug 16 2007, 12:59 PM
I've always wanted to just build all my own gear but it sounded too time consuming and expensive . Let me know how long this whole indever takes i might wanna try it someday.Often times it can be less expensive actually, from my experience. Relatively anyway, you can build a great guitar for ~600$, for example.
Thanks hardtail for the tone advice!
Posted by: Andrew Cockburn Aug 16 2007, 08:32 PM
Great advice Hardtail - thanks, this is all fascinating stuff and point out how complex a subject this it - sounds like you know a lot about this, how did you pick it up? Built an amp yourself maybe?
Anyway, I slightly misspoke about the 5 watts - the original P1 design is based on an EL34 which is much lower power than the Octal EL84 or 6V6. In the course of my deliberations I settled on the P1 Extreme which is an EL84 design, and in my haste forgot to check the change in output wattage resulting form a move from the EL34 to the EL84. The guys at AX84.com know what they are doing so I am pretty sure they will be driving the power tube into saturation, which means as you pointed out, my amp will be LOUD! Louder than I planned in fact.
However, there are a few compensating factors at work here which make it look a little better. Firstly, the P1 Extreme is a single ended design not push pull, which make it a lot less efficient, and ensures you get full tube usage and that lovely overdrive for less wattage (not sure what the conversion factor is exactly but lets say it is something like 0.6. That gives:
Original P1 -> 1 X EL34 -> 12 *.7 * .6 = 5.04W
P1 Extreme -> 1 x EL84 -> 24 *.7 *.6 = 10.5W
So roughly double. When you add to that the logarythmic nature of power increas vs loudness, that actually equates to a 2Log10 increase in volume, which is about 30% if I calculated it right (by no means certain!). So louder, but not disasourously so
Another thread to this is that I want to experiment with various ways of attenuating without losing tone so that I can practice and recording, so having a louder amp will actually help with that goal, or maybe I'll build a 2nd amp with an absolutely tiny output - say 1 - 2 W.
Another point that I have discussed with the AX84 guys - whilst they agree that driving power tubes to distortion gives a great sound, they also pay attention to the design of a preamp so that it does add to the overall sonic character with its own subtle distortion. The feeling I got from them was that the power tube thing, whilst important had been blown up a little out of proportion. They may be right or wrong, part of the fun of this is that I can form my own opinions based on experimentation
Anyway thanks for your info, I learned something - I look forward to discussing the finer ponts of the design and construction with you some more!
Posted by: muris Aug 16 2007, 09:18 PM
I'm not gonna waste your time here guys cause I really don't know this much about small details as you do...
fingers are crossed Andrew,wish you all luck!!!!
Muris
Posted by: Andrew Cockburn Aug 16 2007, 09:20 PM
fingers are crossed Andrew,wish you all luck!!!!
Muris
Heh, thanks Muris - I hope you will listen to some clips when I get it going and give me some opinions on how it sounds relative to tube amps you have played
Posted by: Hardtail Aug 17 2007, 12:03 AM
Anyway, I slightly misspoke about the 5 watts - the original P1 design is based on an EL34 which is much lower power than the Octal EL84 or 6V6. In the course of my deliberations I settled on the P1 Extreme which is an EL84 design, and in my haste forgot to check the change in output wattage resulting form a move from the EL34 to the EL84. The guys at AX84.com know what they are doing so I am pretty sure they will be driving the power tube into saturation, which means as you pointed out, my amp will be LOUD! Louder than I planned in fact.
However, there are a few compensating factors at work here which make it look a little better. Firstly, the P1 Extreme is a single ended design not push pull, which make it a lot less efficient, and ensures you get full tube usage and that lovely overdrive for less wattage (not sure what the conversion factor is exactly but lets say it is something like 0.6. That gives:
Original P1 -> 1 X EL34 -> 12 *.7 * .6 = 5.04W
P1 Extreme -> 1 x EL84 -> 24 *.7 *.6 = 10.5W
So roughly double. When you add to that the logarythmic nature of power increas vs loudness, that actually equates to a 2Log10 increase in volume, which is about 30% if I calculated it right (by no means certain!). So louder, but not disasourously so
Another thread to this is that I want to experiment with various ways of attenuating without losing tone so that I can practice and recording, so having a louder amp will actually help with that goal, or maybe I'll build a 2nd amp with an absolutely tiny output - say 1 - 2 W.
Another point that I have discussed with the AX84 guys - whilst they agree that driving power tubes to distortion gives a great sound, they also pay attention to the design of a preamp so that it does add to the overall sonic character with its own subtle distortion. The feeling I got from them was that the power tube thing, whilst important had been blown up a little out of proportion. They may be right or wrong, part of the fun of this is that I can form my own opinions based on experimentation
Anyway thanks for your info, I learned something - I look forward to discussing the finer ponts of the design and construction with you some more!
I think you have the EL84 and EL34 backwards but yes everything you said makes sense. I forgot about single tube efficiency but it looks like you got it all
And yes preamp is important for overall tone as well but I was focusing purely on saturation. Preamp tube saturation is constant depending on where the gain knob is set and does not respond as well to attack. I really never discovered this till I got a lower wattage amp (my Blues Junior) where I could really push the volume. Now I usually set the amp so that I am on the edge of powertube saturation. When I play harder or boost my signal a little via a pedal my amp passes over that threshold and just sounds heavenly.
Most people including myself use preamp saturation in combination with powertube saturation. In any case the point is to play loud
I have not built my own amp (yet
 ) but I am a Professional Engineer here in the US and I enjoy learning about things like this so I have done a lot of research.
BTW - I think you will be pleasantly surprised by your overall volume. My junior is rated 15 watts running 2 EL84's and I can max out its volume without hurting myself (trust me it is freaking loud). Of course I stand about 20 feet away when I do that but I can't help it, I LOVE tone!
Also! I recommend talking with the folks over at www.eurotubes.com. They might have helpful information to recommend to you as well.
Good luck and keep us updated!
Hardtail
Posted by: Andrew Cockburn Aug 17 2007, 01:09 AM
snip ...
Also! I recommend talking with the folks over at www.eurotubes.com. They might have helpful information to recommend to you as well.
Good luck and keep us updated!
Hardtail
Oops, yes I switched them - well spotted
Looking forward to realising that tube sound, and planning for my next build as well - I'll keep you updated, and thaks for the link.
Posted by: Andrew Cockburn Aug 18 2007, 01:41 AM
Update :
Well my speaker has arrived - looks like it survived the trip intact, here it is 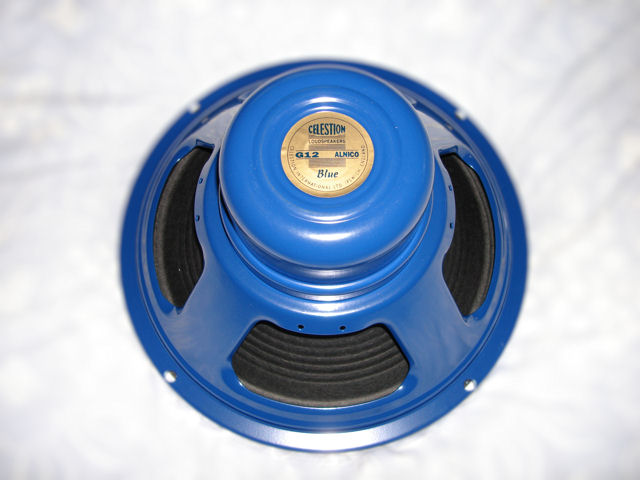
Lovely and blue, hope it sounds as good as it looks ...
I have been talking to a guy on AX84 that might make me a custom case for the amp. I fancy a tweed style because it looks distinguished - something a little like this maybe: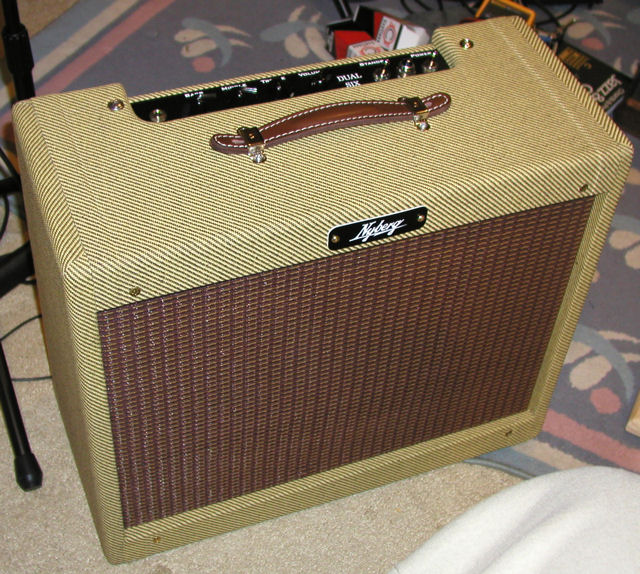
I might have a go at building it myself depending on price, but my woodworking skills are dire. I have been reading up on cabinet construction though and have almost convinced myself that I could do it (a descision I have regretted in the past!)
Tweed is expensive though, I figured about $100 to cover a mod sized combo. The other alternative is Tolex but that is a little utilitarian for my taste. I can buy a ready made tweed covered cabinet form mojo for around $300 plus any mods I would need to fit my specific construction. Still mulling this over really.
I have also researched a couple of sites that will make faceplates to a desigm so I can get some cool labeling for the controls.
Posted by: muris Aug 18 2007, 01:45 AM
Well my speaker has arrived - looks like it survived the trip intact, here it is
Lovely and blue, hope it sounds as good as it looks ...
Ahhh...nice
Posted by: MickeM Aug 18 2007, 01:54 AM
The speaker looks voxy and that cabinet is Fender style or Peavey Classic, Tweed is really great looking. Got one just like that (the Peavey i.e.)
Do you have any instructions on how to construct a cabinet? I will be doing that but have no idea to how to form the inside for the right tone.
Posted by: Andrew Cockburn Aug 18 2007, 02:01 AM
Do you have any instructions on how to construct a cabinet? I will be doing that but have no idea to how to form the inside for the right tone.
No I don't have exact plans - I am currently trying to learn basic construction techniques like box joints and dowel and such, there are some good pages around if you google.
Regarding cabinet tuning and such ... I think you can get away with it if you have an open backed cabinet - that's what I am planning. If you close the back you need to be a lot more careful, and even more careful still if you want to port it appropriately. I am hoping to avoid that at least for my first build. One trick would be to copy an existing design ...
Posted by: tonymiro Aug 18 2007, 02:06 AM
Reverse engineer for the win
Or if you are really rich just buy an old Fender and chuck out the innards .
Cheers,
Tony
Posted by: MickeM Aug 18 2007, 02:13 AM
I have tried, belive me, just didn't find aything easy enough to understand. I found lots of forumlas, could have been mistaken for rocket science...
Give me a hollar if you find any site for dummies
Or if you are really rich just buy an old Fender and chuck out the innards
.Cheers,
Tony
Yes I can do that!
Reverse engineering that is, not that other thing
Posted by: Hardtail Aug 18 2007, 11:52 AM
Regarding cabinet tuning and such ... I think you can get away with it if you have an open backed cabinet - that's what I am planning. If you close the back you need to be a lot more careful, and even more careful still if you want to port it appropriately. I am hoping to avoid that at least for my first build. One trick would be to copy an existing design ...
If your going for a tube combo you can't do a closed back. The tubes will cook themselves up real fast but only after destroying some of your solder work and frying some stuff.
I saw a special edition Fender Hot Rod Deluxe where they didn't cover the body with tolex or tweed they just sanded and stained the cabinet and it was GORGEOUS!!! If you use decent material I'd highly consider staining it. It won't affect the sound, and it will look freaking hot. Oh! and how many people do you see with stained wood amps?


Hardtail
Posted by: JVM Aug 18 2007, 12:14 PM
Yes! The site I use for gathering all the info for my Deluxe has pics of that amp. All I can say - what a beauty! Honestly, I don't think I've ever seen a more beautiful amp.
Posted by: Andrew Cockburn Aug 18 2007, 09:09 PM
Hmm, see what you mean, but I'm not convinced my woodworking is up to a finished piece like that - I was thinking of doing some experiments with dowel joints and a router today to see how close I could get to something reasonably decent - that is a great look to go for though
Posted by: Andrew Cockburn Aug 27 2007, 09:17 AM
Update:
Since I last posted I have postively ruled out the prospect of building the cabinet myself ... I had almost convinced myself that I could do it and that previous disasters had just been bad luck. However, 5 hours in the garage with a lump of wood, Black & Decker Workmate, circular saw and a ruler have now convinced me otherwise. It took me several hours to cut 4 pieces of wood - this was just an experiment. They were supposed to be the equal four sides of a cabinet. Long story short, equal they were not. Cabinet would have been wonky. Forget woodworking, my talents lie in other areas.
I'm still liking the tweed style case, but I can http://www.mojomusicalsupply.com/item.asp?pid=17402&pg=44972&id=4000103. Expensive but it should look good. Unless of course I can persuade a GMCer to make one for me for less ...
In other news, the kit arrived this week: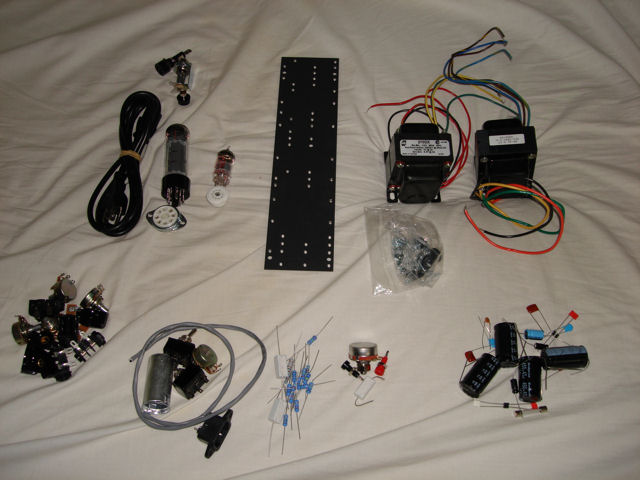
Lots of lovely parts to fit together. The pre-drilled chassis came with it and today I lacquered it.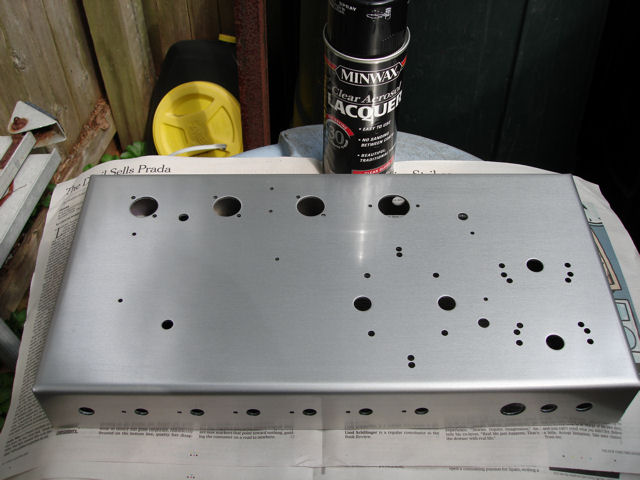
The timing is good - I have 5 days off work over next weekend. I'll be away for a couple of those but that leaves me some time to start hooking this beauty together and realize my path to sonic nirvhana.
In addition to the kit I have ordered some PTFE coated hookup wire, and a decent Fluke Multimeter for testing once it is made. I also ordered a Weber MASS power soak for low volume recording and practice so I should be all set when I have put it together.
Posted by: tonymiro Aug 27 2007, 09:31 AM
Out of curiosity Andrew are you going to incorporate the power soak a la THD in to the amp or keep it separate?
Cheers,
Tony
ps looking forward to the next installment
Posted by: Andrew Cockburn Aug 27 2007, 09:46 AM
Cheers,
Tony
ps looking forward to the next installment
No, I was looking at London Powers Power Scaling box with a view to building it in to the mp, but in the end I decided to keep it somple and get something I could re-use with different amps.
Posted by: tonymiro Aug 27 2007, 10:03 AM
Separate for the win . Only minor downside is it becomes another box to lug around and more cables to trip over .
Cheers,
Tony
Posted by: Andrew Cockburn Aug 27 2007, 10:11 AM
. Only minor downside is it becomes another box to lug around and more cables to trip over .Cheers,
Tony
Yeah, but then I never gig so I'll sling it in a rack and forget about it - have you had any experience with these? Or a maybe a Hot Plate?
Posted by: tonymiro Aug 27 2007, 10:15 AM
I've got a hot plate Andrew it does pretty much what it says on the tin... Only downside I've come across is that you get a bit of treble loss. No big deal as it's not so much that you can't get it back off the eq - amp or graphic pedal/box. Overall I see a powersoak as pretty much essential kit for home use valve amps.
Cheers,
Tony
Posted by: Nick334 Aug 27 2007, 11:03 PM
Good luck Andrew (I think you'll need it).
Posted by: Andrew Cockburn Aug 27 2007, 11:06 PM
Thanks Nick - I've built amps before, but this is my first tube one!
Posted by: Andrew Cockburn Sep 4 2007, 03:15 AM
Update:
Well after a busy week and a trip up to Massachusetts I finally have some time to put into this project!
I am still waiting for my wire to be delivered - it got caught up in the vacation and should arrive tomorrow. Not too bad as I am not returning to work until Wednesday. With a little luck it will arrive early in the day and I can actually start soldering some stuff together!
My Fluke Multimeter arrived, and now I feel like a real professional - I have always wanted an excuse to get one of these. I plumped for the Fluke 115, by no means top of the range, but far from entry level too. I have also ordered a few valves and sockets and some other hardware from http://tubedepot.com/ - a very impressive mail order outfit. They have a great selection, and shipping took just a couple of days. I ordered some EL34s, some 6L6s, a couple of spare 12ax7s and some EL84s just for kicks, along with a number of tube sockets. (The latter is because various of the mods I have in mond for my amp involve additional preamp tubes - the best time to wire in preamp tube heater circuits is at the beginning, its a lot harder later on, so I am building in a spare socket and wiring its heater circuits from the outset).
In the meantime, I have mounted all of the chassis components:
- Transformers
- Input/Output Sockets
- Tube Sockets
- Switches
- Fuseholder
- Potentiometers
- Power Socket
Here are a few pics to be going on with
Top: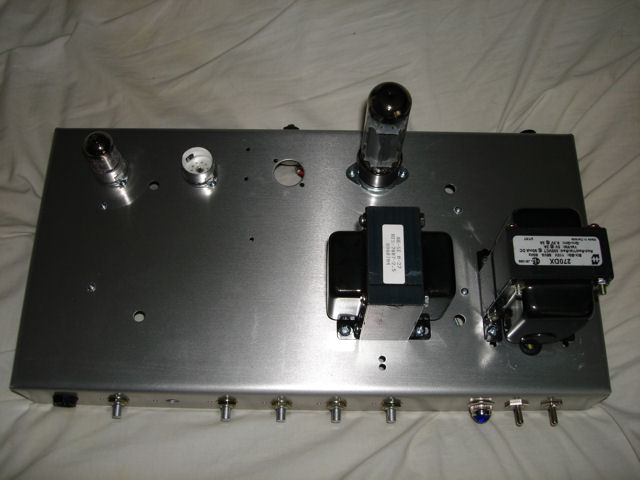
Front: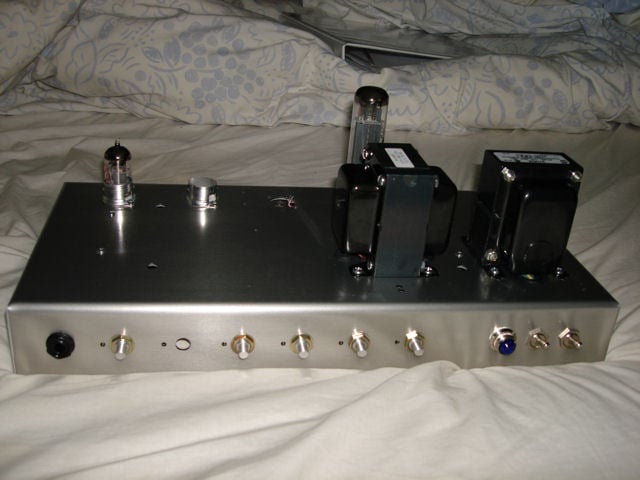
Inside:
Its starting to look almost like a real amp now
Next installment (hopefully tomorrow) is the circuit board, followed by the chassis wiring. This is pretty involved with lots of carefully twisted and routed wires so I won't rush it.
In other news, I have emailed Mojo tone about http://www.mojomusicalsupply.com/item.asp?pid=46711&pg=44972&id=4000123 - hopefully I will be able to fit everything into it but I need some measurements from them first.
And finally, I bought a tube tester off eBay - a big old thing built in about 1960 but it still works - amazing!
Thats it for now, all things being equal I hope I'll have an update tomorrow!
Posted by: mattacuk Sep 4 2007, 03:29 AM
Im very impressed andrew!! Im sure the finished product will be awsome. Im lazy so ordered myself a tube amp and tube screamer pedal to match it !
Posted by: Andrew Cockburn Sep 4 2007, 03:32 AM
Yeah, I think I'll do that too Building is a lot of fun, and I may even get a decent tone out of it, but buying cool stuff is great as well!
Posted by: benhowell Sep 4 2007, 03:59 AM
Love the look of the chassis Andrew.
May i be cheeky and ask how much it will cost to make in total (roughly)?
-Ben
Posted by: mattacuk Sep 4 2007, 04:24 AM
Building is a lot of fun, and I may even get a decent tone out of it, but buying cool stuff is great as well!here too tubey goodness
Posted by: Andrew Cockburn Sep 4 2007, 05:02 AM
May i be cheeky and ask how much it will cost to make in total (roughly)?
-Ben
Sure - the kit of parts cost around $250, the speaker another $250 (I went high end for that) and I will be spending at least $300 on a combo case. Add to that some one off purchases of tools etc. I could probably have saved some money along the way by sourcing the components myself, a cheaper speaker and making the case, but even then this is not a cheap way to get an amp, but its a lot of fun and helps you understand what goes into them. Plus, in theory it should be a little better than a mass produced amp due to good component selection and point to point wiring.
Posted by: tonymiro Sep 4 2007, 07:02 AM
Though if I was building it I'd have to factor in the cost of the amp tech's time and new parts redoing my bodged job and the trips to the hospital to sort out the burns/scars from the soldering iron  .
.
Looking good Andrew - can't wait for the sound clips when she's ready .
Cheers,
Tony
Posted by: Pavel Sep 4 2007, 07:07 AM
Wow Andrew! Great start! I think i would never dare to start building something like that! Can't wait for the result!
Posted by: Andrew Cockburn Sep 5 2007, 08:57 AM
Update:
Cool - my PTFE coated wire arrived early this afternoon allowing me to swing into action!
I don't have a permanent electronics lab yet - need to move before I can get that, I set up a table in the garage, looks pretty technical if I do say so myself!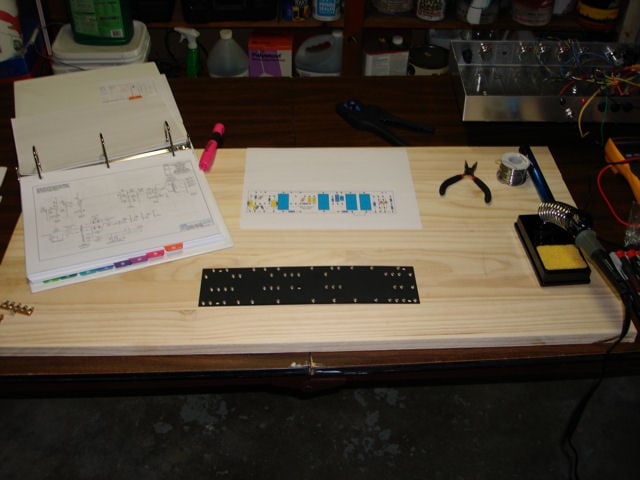
In the picture above, you see the tagboard just before I started to solder all of the board mounted components on it.
About 2 hours of hard work later, I ended up with this: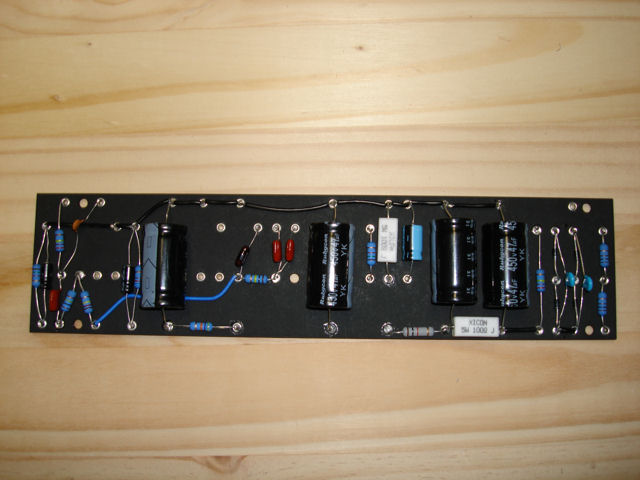
Although I had done a lot of soldering in the past, I had never used an eyelet board like this. I would have preferred a turret board actually, but this is what came with the kit of parts and turret boards are hard to fabricate without the right tools, chief among those being a drill press which I do not posses. It all went well, including soldering of the underside wires that you can't see in the picture. Next step will be to wire he board up to the chassis components and a whole heck of a lot of other wiring. I am planning to make a start on that next weekend, for now I am pleased with progress.
In other news, I have been corresponding with Mojo Sound about a case for this beast - I have narrowed down what I want and I am waiting for a quote. I am now expecting it to be around $400 because we are into custom cases - their off the peg case wouldn't quite do it.
Posted by: JVM Sep 5 2007, 09:33 AM
Woo, gettin' expensive Good progress though my man!
Posted by: Andrew Cockburn Sep 5 2007, 09:38 AM
Good progress though my man!Yeah, this definitely isn't a cheap route to an amp ... but it is a lot of fun
Posted by: tonymiro Sep 5 2007, 06:36 PM
And as you've said you'll come away with a real understanding of how (the) amp(s) works and be able to repair it if it's ever necessary - priceless.
Cheers,
Tony
Posted by: MickeM Sep 5 2007, 06:47 PM
Wow, this is looking all great!
Your desk looks arranged though, an open plier placed there to live things up. Too obvious! 
Posted by: benhowell Sep 5 2007, 06:59 PM
Thanks for the answer Andrew-Its actually alot cheaper than i thought!
Maybe you can build me a 'dumble' inspired amp if things go well?!
-Ben
Posted by: Andrew Cockburn Sep 5 2007, 08:42 PM
Maybe you can build me a 'dumble' inspired amp if things go well?!
-Ben
Heh, maybe
The designs are out there!Your desk looks arranged though, an open plier placed there to live things up. Too obvious!
Cynic!
Posted by: Andrew Cockburn Sep 5 2007, 11:00 PM
Update:
Having thought about it a little more, I'm not 100% happy with my efforts above. The joints were fine and electrically sound I am sure, but I did not like the eyelet board much. It will only get worse as I start attaching wires - some of those holes are already running out of space. Add to that I am using 18awg wire - only necessary for the heater circuits but I figured thicker wire would be better so decided to use it throughout.
After some thought this morning and a little research, I decided to redo this part of the project as a turret board. In terms of time this is a setback - a waste of 3 hours yesterday, and an additional wait for parts and another couple of hours to make the board and another hour or so to re-solder it. But I am not in a rush, and I am treating this as a learning process. I want people to be impressed with my amp, and I am just not happy with the look of the above board, it looks amateurish. In financial terms this isn't a big deal. I'll have to re-order all the parts that went on the board, but they are fairly cheap - resistors are about 5c, even the larger caps will only be a couple of dollars each. Probably the total for new component will come to $15, so no big deal. Turret board and turrets are pretty cheap, the only real expense will be a drill press - you can get those for $50 and up, which was cheaper than I thought, plus I will be able to use the press to drill my own chassis for my next project whatever that is.
With a little luck, if I order the parts today I will have them for the weekend. If not, there is some chassis wiring I can get started on even without the board.
In other news, Mojo have been very helpful in working up a cab spec for me, and the final cost is $352.50 which was cheaper than I thought, although shipping will probably add a fair amount to that.
Posted by: Andrew Cockburn Sep 9 2007, 11:47 AM
Update:
Sep 6th, 2007
Today I ordered a drill press. Its got a laser so it must be good. I sent an order to Mouser Electronics for new board components - the big caps were about $10 each - ouch! So I revise my estimate to about $50 of components and some more for the turrets and board. It will probably be after the weekend before I get all of this together, so my weekend task will be to wire up the chassis, I can use my existing board as a guide, I just won't hook it up. Once all the wiring is done, it shouldn't take long to hook all the wires up to the new board when I have built it.
Sep 8th, 2007
A big push today - I spent the day wiring up the chassis, ready to drop the new board in when I have it done. Still waiting parts for that, but the wiring went well. All told it took me about 6 hours to do this - partly because I was getting used to making the twisted looms, but also because there is a lot of nitpicking, and I wanted to do a good job of routing the wires. It doesn't look a lot for 6 hours work, and looks messy because there are a lot of loose wires waiting to be soldered to the board, but I'm pretty pleased with it. The hardest part was the heater filaments (green and grey twisted wires) - I didn't get those perfect but they should work fine.
Next step will be to make the new board - first I have to drill it and fix the turrets in, then wire all the components in place. It will be probably 3 weeks before I get around to that as I have a vacation planned and I'm still waiting for parts and the drill press, but another couple of weekends and I should be all done
Posted by: Smikey2006 Sep 9 2007, 11:17 PM
Looks like its really coming together.. have you thought of a logo to put on your amp.. like a giant cool written A/C or something 
Posted by: Andrew Cockburn Sep 9 2007, 11:38 PM
I discussed this on chat with Rokchik a couple of weeks ago - my first amp will be called the A.C. 1
. I'll probably add a logo for Cockburn Amplifiers or something as well - I want it to look as good as possible!
Posted by: mattacuk Sep 10 2007, 12:30 AM
Im impressed with your efforts Andrew. Had that been my soildering, it would of ended up being sold as "outsider art" like when homer simpson cocked up making his DIY BBQ
Posted by: muntahunta Sep 10 2007, 12:48 AM
your a braver man than i.
ive always wanted to make my own amp and guitar but i havent had the money, knowledge or skill to do so.
if i were to buy all the expensive components and screw it up i wouldnt be able to live with myself lol.
cant wait to hear your finished amp. good luck
Posted by: Andrew Cockburn Sep 10 2007, 02:41 AM
Thanks guys I'll be posting clips as soon as I get it working - assuming the whole thing doesn't explode in my face when I turn the power on
Posted by: tonymiro Sep 10 2007, 05:35 AM
Looks like it's coming on really well Andrew. What type/s of knob/s are you going to put on it when it's ready- chicken head/knurled metal etc - are you going for a vintage or a more modern sort of aesthetic?
Cheers,
Tony
Posted by: MickeM Sep 10 2007, 05:44 AM
I'll be posting clips as soon as I get it working - assuming the whole thing doesn't explode in my face when I turn the power on If that happens we'd want a clip of that too, video if possible
Looking real good so far!
Posted by: Andrew Cockburn Sep 10 2007, 07:35 AM
Looking real good so far!
Heh, maybe I'll video the big switch on and post the highlights as an amp building lesson
Cheers,
Tony
It came with chicken heads, so I see no reason to change, they are in keeping with the tweed cab after all
I'll also probably go for a plain face plate with white lettering, but not for a while. My plan is to build the basic amp then add some unique mods - on my list for thinking about are:1. Switchable cascode boost stage - should give me something approaching a high gain sound
2. Swithchable triode/pentode - I'll try this but people have reported that it doesn't sound too good on this amp
3. Switchable Bypass capacitor - Fat, normal, bright
4. Switchable EL34/EL84 - a tough one this as I have to figure out a way of dropping the anode voltage by 100v
5. Effects loop - simple serial unbuffered would be easy, or maybe I'll use an additional 12ax7 and buffer it
All of these are moving away from the safe world of tried and tested schematis though, so the most likely thing that will happe is that I'll blow something up!
Posted by: tonymiro Sep 10 2007, 07:49 AM
+1 for the chicken heads - more in keeping wih the vibe I think you are after.
As it's a low wattage amp personally I'd leave it as triode Andrew. But it's a matter of personal taste...
The only thing I miss on my tube amp is an effects loop. To compensate in part I use an external Radial Tonebone loop controller. But I kind of still would like to have a loop on the amp...
Cheers,
Tony
Posted by: muris Sep 10 2007, 08:32 AM
Ohohoho...you've been busy Andrew,that's for sure!!
Posted by: Andrew Cockburn Sep 10 2007, 09:23 AM
As it's a low wattage amp personally I'd leave it as triode Andrew. But it's a matter of personal taste...
The only thing I miss on my tube amp is an effects loop. To compensate in part I use an external Radial Tonebone loop controller. But I kind of still would like to have a loop on the amp...
Cheers,
Tony
Well its a pentode design based on an EL34 for the power stage, but I was thinking of adding a triode switch to see what it sounds like (and make it quieter), although I should be getting the attenuator in a week or so ...
Posted by: buttmonk Sep 11 2007, 01:55 AM
Sorry if bit off topic. Are u gunna do a totally custom build or base it on a kit? Just interested cos I completed a Carvin Bolt+ kit a few months back and am now just starting on a USA Custom Guitars based guitar (which will be the dogs danglies:) ). The neck will be USACG and finished by me, the body is a blank which I will shape myself.
After that I was thinking building a tube amp, and I guess that after reading ths thread that will now turn out to be 1 of the AX84 variants. Thanks Andrew, am looking forward to seeing and hearing the finished product!
Posted by: Andrew Cockburn Sep 11 2007, 02:41 AM
After that I was thinking building a tube amp, and I guess that after reading ths thread that will now turn out to be 1 of the AX84 variants. Thanks Andrew, am looking forward to seeing and hearing the finished product!
I based it on a kit from Doberman Amps:
http://dobermanamps.com/
Run by the guy that founded AX84.com. Its not a kit in the sense that there are exhaustive instructions - what you see on the website is all there is, its really just saving you the effort of ordering parts and drilling the chassis and making the board yourself. You really need to have some understanding of electronics if you want to build AX84 designs - although people are helpful on the forums there is a certain basic level of knowledge required. This was fine for me, and probably you too since you have built the electrics in your guitar at least, I didn't research more thorough options as I was happy with what AX84 had.
As you can see form my posts I have decided to dispense with the card anyway and make my own based on turret board - I'll let you know how that turns out.
I'd be very pleased if you decided to follow my example and build an amp as well
Posted by: buttmonk Sep 11 2007, 03:16 AM
http://dobermanamps.com/
Run by the guy that founded AX84.com. Its not a kit in the sense that there are exhaustive instructions - what you see on the website is all there is, its really just saving you the effort of ordering parts and drilling the chassis and making the board yourself. You really need to have some understanding of electronics if you want to build AX84 designs - although people are helpful on the forums there is a certain basic level of knowledge required. This was fine for me, and probably you too since you have built the electrics in your guitar at least, I didn't research more thorough options as I was happy with what AX84 had.
As you can see form my posts I have decided to dispense with the card anyway and make my own based on turret board - I'll let you know how that turns out.
I'd be very pleased if you decided to follow my example and build an amp as well
Sorry Andrew, I think I have confused things here. My last post was really asking JVM about the guitar he was gunna build but that was not clear in my post. Anyways, I will forget about that since this is a thread about amps. Thanks for the additional comments and info tho:)
Posted by: tonymiro Sep 11 2007, 03:55 AM
My stupid Andrew - hadn't noted it was a pentode. Yes then pentode/triode and if it was me I'd keep it in triode
.Cheers,
Tony
Posted by: JVM Sep 11 2007, 04:07 AM
Well I'm going to order parts from a bunch of different places, so it won't be like I cut out the body myself (especially since I decided I want it to be a chambered body style - no way I'm attempting that on my own!) but it won't be a kit either. And I may eventually follow andrews amp building footsteps
Posted by: buttmonk Sep 12 2007, 02:37 PM
Cool. Be sure to post a blog of ur build on the forum in the Cockburn style...
I will be doing the same, praps Kris should start a DIY forum...
Posted by: benhowell Sep 19 2007, 01:48 AM
Hows the amp going Andrew? any progress lately?
-Ben
Posted by: Pavel Sep 19 2007, 04:51 AM
-Ben
I think Andrew's amp is Nuclear Powered so he wants to make it a big surprise
Posted by: Andrew Cockburn Sep 19 2007, 06:14 PM
I'm on vacation in the UK at the moment so the next stages will occur when I return - maybe this Sunday or the weekend after depending on how things go, I'll keep you all up to date!
Posted by: mattacuk Sep 19 2007, 06:55 PM
Hoorah !!
Posted by: benhowell Sep 19 2007, 06:57 PM
Ha ha i see.
Hope your enjoying the UK's lovely weather!
Cant wait to hear the amp!
-Ben
Posted by: tonymiro Sep 19 2007, 07:56 PM
You mean you didn't take it with you to work on? What sort of holiday is that
. Next you'll be telling us you left the Jem at home .Cheers,
Tony
ps - hope you have great, and well earned, holiday
Posted by: JVM Sep 19 2007, 08:17 PM
..you didn't leave the Jem at home did you? 
Posted by: Andrew Cockburn Sep 19 2007, 11:47 PM
Um, yes ...
my friend I am jamming with does have a really nasty fender strat copy copy (double word intentional!!) it sucks, but we are doing mostly acoustic stuff at the moment anyway, and he has a nice Takamine.
Posted by: Andrew Cockburn Sep 24 2007, 09:36 PM
Update :
Ok, back from my vacation. While I was away, I took delivery of an oscilloscope and signal generator. Neither are essential for building an amplifier, but they can be useful for scoping input vs output, measuring gain and also for setting and checking tube biases. Besides, I wanted an excuse to get another Oscilloscope! The Scope was bought from a nice guy on AX84.com, and I bought the signal generator from Ebay.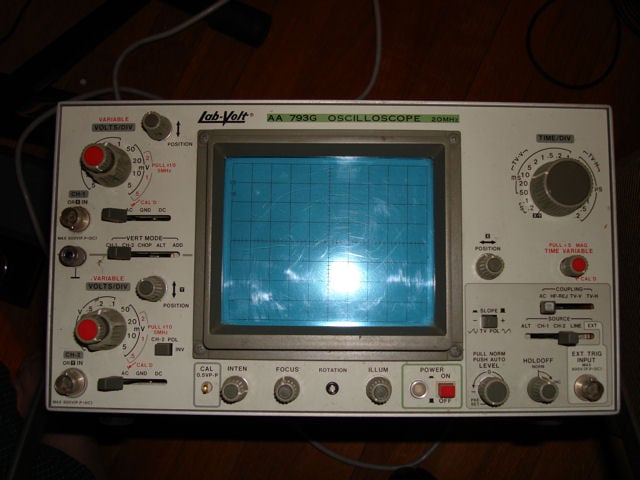
Its fairly basic - only 20Mhz, which is great for audio but not up to digital and radio applications, but the price was right and it will do everything I need. Its used, but in good working order.
The other big news is that the cab arrived from Mojotone. It looks really cool, and seems to fit my chassis pretty well - I had a long email discussion with Mojo about dimentsions and they helped me to specify exactly what I want. The only slight issue is going to be travel of the knobs I think, but I might get away with it.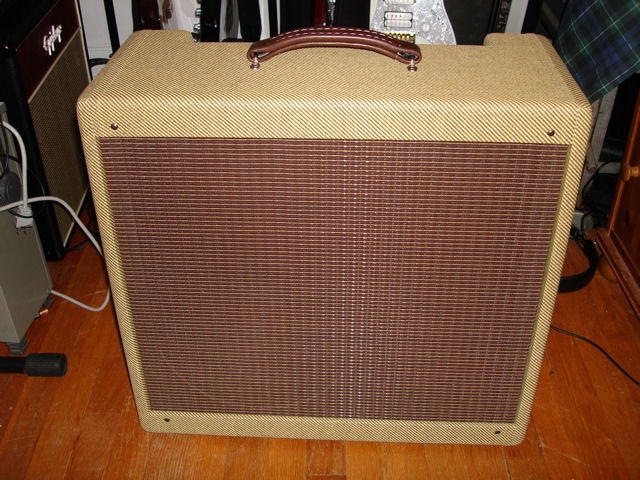
The next step was to mount the speaker ...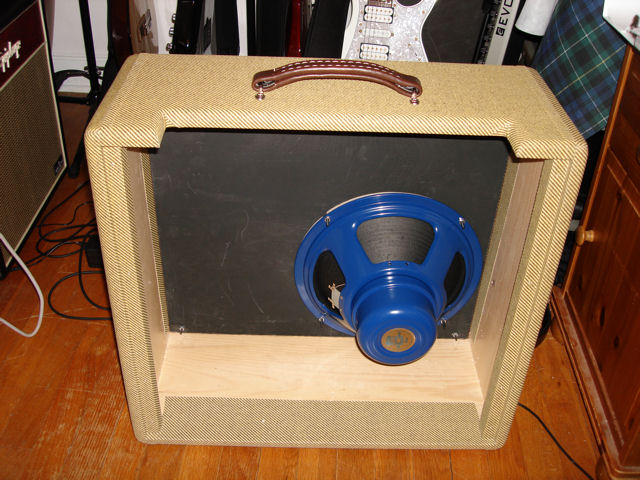
Looks good in there
Now I need to get through this next week, and I have some more vacation time around next weekend. I am going to see Steve Vai in Atlantic City, but there will be a lot of other time to work on my amp. I have to build the turret board, solder in the components and hook it up to the chassis wires - then I will be into testing. I am hoping to get a lot of that done around next weekend.
Posted by: muris Sep 24 2007, 09:55 PM
Nice cab Andrew,can't wait to see more!!
Posted by: tonymiro Sep 24 2007, 10:14 PM
+1 - great cab
.The scope kind of brings back (mostly good) memories of A level physics
.Cheers,
Tony
Posted by: Pavel Sep 24 2007, 10:20 PM
Great progress Andrew!
And of course, no picture without a JEM now It just has to peak around the corner
Posted by: Andrew Cockburn Sep 24 2007, 10:51 PM
And of course, no picture without a JEM now
It just has to peak around the corner Of course - it is NEVER more than 3 feet away from me
Actually I spent last week in the UK, and only had a nasty Strat Copy to play on - man it was sweet to pick up Galadriel again !
Posted by: benhowell Sep 24 2007, 11:08 PM
That cab looks really good Andrew-looks like an old fender, which can only be a good thing!
-Ben
Posted by: JVM Sep 24 2007, 11:11 PM
Your cab (besides being in tweed) looks about the same as my hot rod deluxe. It's going to be heavy
Posted by: mattacuk Sep 25 2007, 12:44 AM
I love the tweed look cab - and yes its very much like the fender hot rod in appearance!
Posted by: Andrew Cockburn Sep 25 2007, 12:45 AM
-Ben
Yes, that was definitely the look I was going for
Posted by: Andrew Cockburn Oct 7 2007, 05:41 AM
Update:
Busy few days ... Steve Vai was awesome and the trip to Atlantic city was a lot of fun. Work reared its ugly head however and I had to cancel most of my remaining vacation. This weekend however I made some progress. First, I assembled the drill press - not as trivial a task as you might imagine It was pretty cheap but does the job really well. Surprisingly, the laser is a lot more than a gimmick as it lets you pretty accurately place the thing you are drilling. I did a test drilling of some fibreglass board to see how it would work out. Went pretty well, but my holes were not in straight lines - the trick for that is to clamp a piece of wood to the press as a straight edge - I'll do that for the real board. Here is a pic of the assembled drill press, drilled board and the "X marks the spot" laser sighting.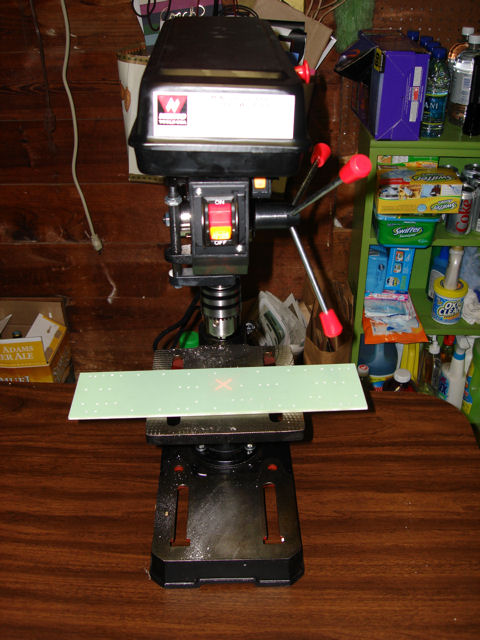
Next step would be to place the turrets using the turret tool. Unfortunately however, although I have the tool there is no way to secure it in the drill press. I have ordered a drill press vise which should arrive in time for next weekend and I can try and fit a few turrets to make sure that is all ok. If that works out I'll drill a new board with the straight line technique and fit the turrets.
Posted by: tonymiro Oct 7 2007, 11:25 PM
Looking good Andrew,
presumably the wood also helps stop the thing you are drilling twisting as the drill goes through?
Cheers,
Tony
Posted by: Andrew Cockburn Oct 8 2007, 12:44 AM
presumably the wood also helps stop the thing you are drilling twisting as the drill goes through?
Cheers,
Tony
I imagine it would, but I have this set to the lowest RPM and I didn't find that to be a problem.
Posted by: Francis Viviers Oct 15 2007, 04:25 PM
Hi Andrew
Are you planning to build Reverb Into the amp ? If so, i need your help as well. I bought an old orange head that has no reverb built in and i want to build in a "vintage" style reverb module into it. Got any ideas ?
Posted by: Andrew Cockburn Oct 15 2007, 07:55 PM
No plans for reverb in this one - addition of reverb requires addition of a tank and a couple of tubes. Its certainly possible but not for the faint hearted, and to some extent you would be treading on unknown territory, you would need to design the circuits yourself.
An easier option would be to split the pre and power amps and put in a couple of sockets for an effects send and route it through a digital reverb effect unit.
Posted by: Francis Viviers Oct 15 2007, 08:25 PM
An easier option would be to split the pre and power amps and put in a couple of sockets for an effects send and route it through a digital reverb effect unit.
Dan Electro has this : http://www.musiciansfriend.com/product/Danelectro-Spring-King-Spring-Reverb?sku=151904 . Or The T-Rex reverb or the EHX Holiest grail. Maybe i should just for that option inside the effects loop.
Posted by: Andrew Cockburn Oct 15 2007, 08:59 PM
If you already have an effects loop, yes, this is by far the easiest option!
Posted by: Andrew Cockburn Oct 22 2007, 04:27 AM
Update:
This afternoon I completed the turret board - hurrah! I'm now in a position to rebuild the board to the higher standard I crave. With the correct tools,amking the turret board turned out to be pretty easy, I would say an hour from start to finish. The first step was to accurately place the plan on the board as a drilling guide.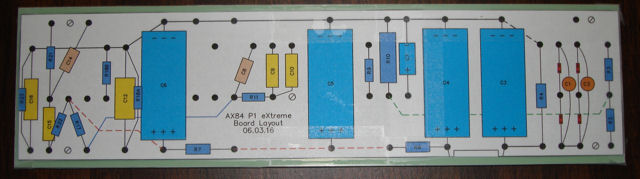
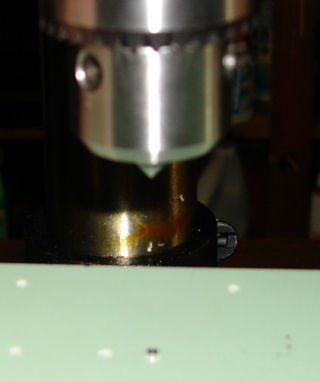
The drilling plan wouldn't actually fit on one piece of letter sized paper so I printed it in 2 parts and taped them together, then taped them to the board. Next step was to set up the drill press with a piece of wood for a guide to aid drilling in straight lines.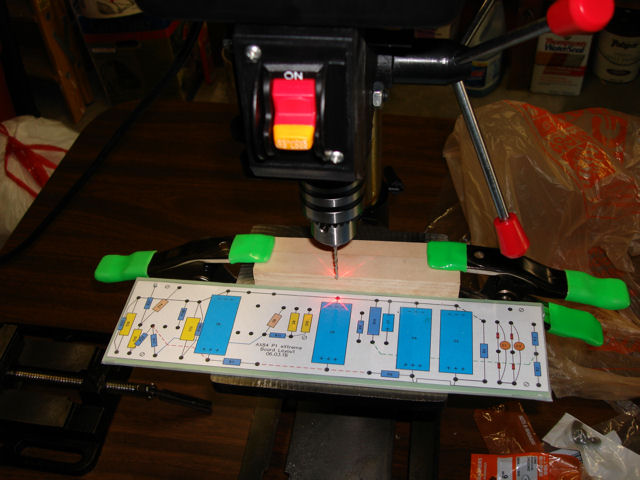
This worked pretty well in conjunction with the laser, and allowed me to quickly drill the board.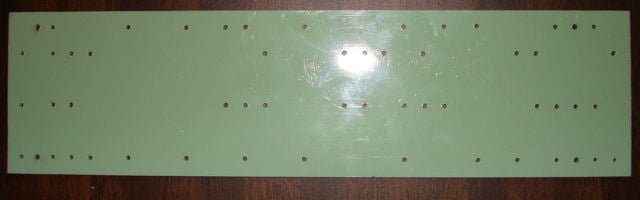
Much better than the test board, all holes are pretty much lined up. Note the slightly larger holes - these are screw holes to fix the board to the chassis.
As is always the case, my efforts to order everything I need online are doomed to failure. The drill press vice arrived but it come with no way to fix it to the press. A trip to home depot later, and I had a set of bolts that didn't fit the press either - duh However, knowing my predilection to fail embarrassingly to get the right sized pieces, I also bought some washers, and they ended up being a far better way to secure the turret tool in the drill press. With this in place it was an easy matter to insert the turrets and press them into place.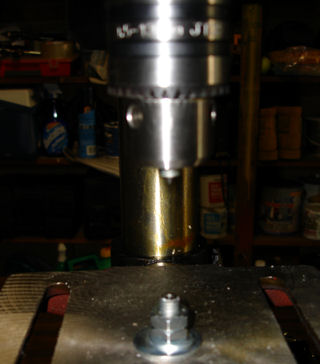
Finally, after half an hour of stamping I have a finished board.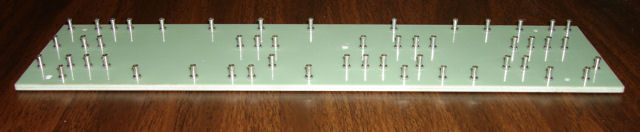
I called it a day there - now I can go back to soldering the board, and wiring it to the chassis, another day!
Posted by: Andrew Cockburn Oct 28 2007, 12:36 AM
For those of you that are interested in my continuing journey, future updates will occor on the new http://www.guitarmasterclass.net/blog/
To jump straight to my entries, click http://www.guitarmasterclass.net/blog/?cat=6
Posted by: Andrew Cockburn Jan 2 2008, 07:06 PM
Check the blog for my latest update!
Posted by: benhowell Jan 2 2008, 07:10 PM
The amp looks SWEET Andrew! Congratulations!
Love to hear how it sounds!!
-Ben
Posted by: Andrew Cockburn Jan 2 2008, 07:20 PM
Love to hear how it sounds!!
-Ben
Thanks Ben, I'll be working on recording it in the next week or two - I have a couple of capacitor mikes already, but would really like to try it with an SM58 and SM57 as well - I think I'll be eBaying in the coming weeks
Posted by: benhowell Jan 2 2008, 08:55 PM
Sounds great Andrew, cant wait to hear it. Perhaps you'll start your own boutique amp company?!
-Ben
Posted by: Milenkovic Ivan Jan 2 2008, 11:23 PM
Hey Andrew, I would really like to see that amp, but my browser don't open the pictures for some reason. Any ideas how to fix that?
Posted by: JVM Jan 2 2008, 11:24 PM
Hmm, did you try right clicking and selecting "view image"? Also, try the blog, he should have most of the images and some new ones in there.
Posted by: Andrew Cockburn Jan 3 2008, 12:00 AM
Not sure what the problem would be Ivan, but as JVM says have a look at the GMC blog
Posted by: Muris Jan 3 2008, 12:02 AM
Combo looks wonderful Andrew,congrats on your progress!!
I see you're planning to mic it and record some clips,
when would that be,any dates??
I'm so anxious about it!!!!
Posted by: Milenkovic Ivan Jan 3 2008, 01:18 AM
I can see the pics now and WOW Andrew, that is one fine piece of machinery right there Very very neat and vintage looking amp. Simply great. We must hear some samples!!
PS Next project idea - hybrid amp with some heavy gain stages - AC2 ?
Posted by: Andrew Cockburn Jan 3 2008, 02:21 AM
Thanks guys - I'll need to spend some time getting the best sound out of it but I will post some clips for sure
The AC2 I am still thinking about - I want an amazing clean channel and some brutal high gain, so a multi channel design I think - I may split the pre and power amps as well
Posted by: Muris Jan 3 2008, 04:04 AM
The AC2 I am still thinking about - I want an amazing clean channel and some brutal high gain, so a multi channel design I think - I may split the pre and power amps as well
AND you're gonna send it my way as soon as you finish it,name the price Andrew
Posted by: Andrew Cockburn Jan 3 2008, 01:14 PM
I just want all your guitar skills and I'll make you a new amp every month forever!
Posted by: mattacuk Jan 3 2008, 01:22 PM
I want Muris Guitar Skills and your amp building skills. Together they will join force to make me "Super Guitar Hero!"
Posted by: Andrew Cockburn Jan 3 2008, 01:50 PM
Hmmm. What do I get out of the deal - your fishing skills ???
Posted by: mattacuk Jan 3 2008, 01:51 PM
Sure why not !! Go fishing this weekend.. try a few scales.

Posted by: Muris Jan 3 2008, 02:37 PM
I can share some Ninja skills if you're interested?
Posted by: Andrew Cockburn Jan 3 2008, 03:13 PM
I can share some Ninja skills if you're interested?
Ahh, now you're talking - I can be a ninja fisherman

Posted by: Muris Jan 4 2008, 03:26 AM
Guess that means NO
Posted by: Andrew Cockburn Jan 4 2008, 03:51 AM
Well I'd rather be a Ninja guitarist than a Ninja fisherman to be honest ... but the Ninja is definitely in
Posted by: Muris Jan 4 2008, 03:55 AM
Coolness!!!
May I offer you some nice shurikens,great for typical pentatonic 2nps runs??
Posted by: mattacuk Jan 4 2008, 10:11 AM

Posted by: Tomy Jeon Jan 4 2008, 10:42 AM

Posted by: Andrew Cockburn Jan 4 2008, 01:40 PM
May I offer you some nice shurikens,great for typical pentatonic 2nps runs??
Why thankyou Muris, much appreciated! I never knew you need Shurikens for pentatonic runs, that is helping my speed a lot
Posted by: Muris Jan 4 2008, 02:34 PM
You're welcome Andrew
Sorry for ruining your thread again,I just don't know what's happening to me
Anyhow,looking forward to final stage of making this amp,gonna love it for sure!!!
Posted by: Milenkovic Ivan Jan 4 2008, 03:43 PM
Hey Andrew, are you thinking of tube design for AC2 maybe?
Posted by: Andrew Cockburn Jan 4 2008, 04:00 PM
Definitely Ivan - tube all the way! I might use solid state in parts if there is a good reason for it but I really want the signal path to be all tube.
I'm still thinking about it, and maybe I'll go for a Fender Style clean kind of amp next.
Then I would really like to make a rack - separate preamp in one slot, with digital effects in the next slot then power amp (I'll just buy the digi effects for chorus reverb delay etc, not build it). I would like a power amp design that you can add or remove tubes to get the right volume as well. I'd also like 2 - 3 channels in the preamp for different voicings - clean, crunch & hi gain
Lots of thoughts here, no firm conclusions yet!
Posted by: Muris Jan 4 2008, 04:16 PM
I'm still thinking about it, and maybe I'll go for a Fender Style clean kind of amp next.
Then I would really like to make a rack - separate preamp in one slot, with digital effects in the next slot then power amp (I'll just buy the digi effects for chorus reverb delay etc, not build it). I would like a power amp design that you can add or remove tubes to get the right volume as well. I'd also like 2 - 3 channels in the preamp for different voicings - clean, crunch & hi gain
Lots of thoughts here, no firm conclusions yet!
Sounds tooo great,fingers crossed Andrew!!!
Powered by Invision Power Board (http://www.invisionboard.com)
© Invision Power Services (http://www.invisionpower.com)