Velvet Roger Triads - 3 string chords SI Lesson
Triads - 3 string chords
Contents |
Introduction
Hey guys, my name is Roger, am 33 years old and living in Amsterdam, The Netherlands. I've been playing the guitar seriously for about 1.5 years now (with also some less serious playing back when I was 16-17). Besides playing the guitar, I have always been involved in playing music (piano, keyboards, drums), which certainly is helpful for rhythmic feeling etc. About 5 months ago I started my own band together with two other persons, which gives a nice boost in my playing abilities as well.
I hope you will like my first S.I. video lesson.
Structure
1. About the lesson 2. Theory background 3. The lesson 4. How to implement the exercises 5. Last words
About the lesson
This lesson is primarily aimed towards beginners (with some theory knowledge) which would help them gain knowledge on the following aspects:
- Basic triad chords - Fretboard interval knowledge (focussed on chords) - Finding chords on several places on the fretboard - Chord inversions - Arpeggio alternate picking (not main goal of this lesson)
Theory background
Today we are covering the very basic building blocks of chords: triads. For a more extensive explanation about triads, please see this series made by Andrew.
Basically, a major triad chord is build from the following 3 notes: the root (1), the major third (3) and the perfect fifth (5). If you look at this chord from an interval point of view the interval between the root and the major third contains 4 semitones (and is called a major third interval) and the interval between the major third and the perfect fifth is contains 3 semitones (this is called a minor third interval). So basically the major triad chords is a major third interval + a minor third interval.
A minor triad chord is build from the following 3 notes: the root (1), the minor third (b3) and the perfect fifth (5). If you look at this chord from an interval point of view the interval between the root and the minor third contains 3 semitones (and is called a minor third interval) and the interval between the major third and the perfect fifth is contains 4 semitones (this is called a major third interval). So basically the minor triad chords is a minor third interval + a major third interval.
The exercises in section 3 are based on the C-shape, A-shape and E-shape basic triad chords in the so-called CAGED system. As Andrew made an excellent theory series about the CAGED system I would certainly like to refer to that.
Basically CAGED shapes are referring to 5 standard chord shapes which are very useful for many things (scale knowledge, chord knowledge, fretboard knowledge etc), and we will be using 3 of those 5 standard chord shapes as the basis for our current lesson:
First we have the so-called C-shape. For example, the D major chord in it's C-shape is tabbed out like this:
|---2---| 3rd
|---3---| Root
|---2---| 5th
|---4---| 3rd
|---5---| Root
|-------|
Then we have the so-called A-shape. For example, the D major chord in it's A-shape is tabbed out like this:
|---5---| 5th
|---7---| 3rd
|---7---| Root
|---7---| 5th
|---5---| Root
|-------|
And finally, we have the so-called E-shape. For example, the D major chord in it's E-shape is tabbed out like this:
|---10---| Root
|---10---| 5th
|---11---| 3rd
|---12---| Root
|---12---| 5th
|---10---| Root
As already mentioned above, the major/minor triads are build from the root (1), major/minor third (b3/3) and the perfect fifth. You will notice in the exercises in section 3 that we are actually using so-called inversions of the D major and minor chord for each of those 3 string positions.
I will try to explain very shortly what inversions are: Again taking the example D chord: basically, if your playing the root note (D) on the bass string (lowest string used), this means that you have no inversion. When you play your major/minor third (F#) on the lowest string used, you are playing an inverted chord (inversion #1). When you play you perfect fifth (A) on the lowest string used, you are playing again an inverted chord (inversion #2). Most important thing to remember here at this moment is: if the root note is not the lowest note played (effectively the lowest note of a chord is very often also the note played on the lowest string), you are actually playing an inverted chord.
The lesson
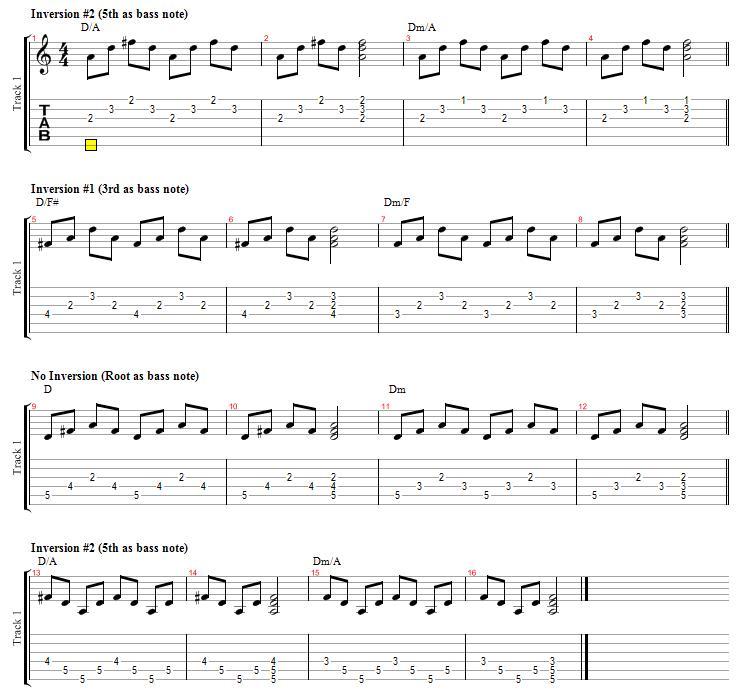
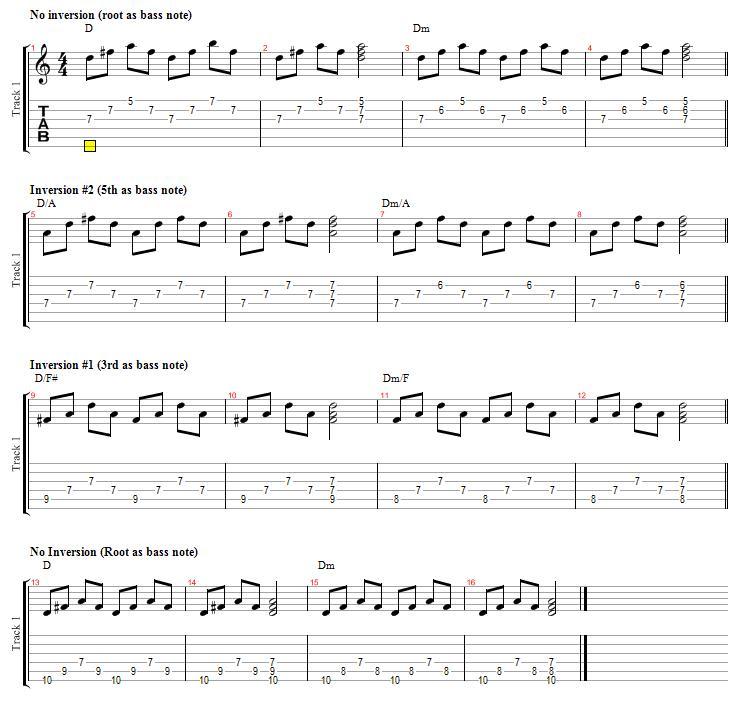
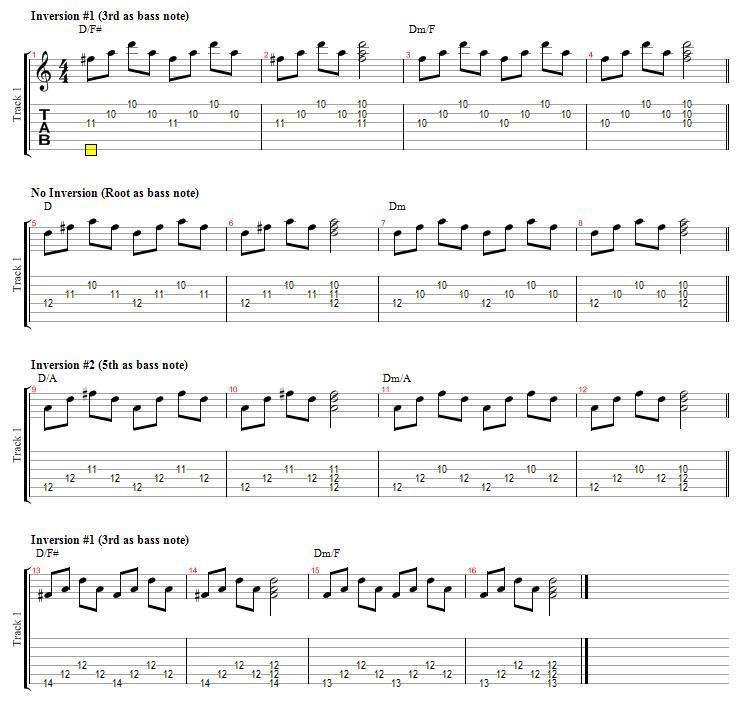
For this lesson, I have recorded video's which cover 3-string simple major and minor triad chords at 3 positions on the fretboard. I have separated the video's for each position of the D major and D minor triad chords (video 1: C-shape position, video 2: A-shape position, video 3: E-shape position). The video's start of with a picture of the basic D major chords (see tabs in section 3). I have attached the Guitar Pro tabs for reference as well.
Video 1: C-shape D major / D minor triad arpeggio's
In this exercise you start by playing 3 string (the high-E, B and G string) arpeggio's of the D major chord, followed by the D minor chord on the same 3 strings at the C-shape position (see section 2 for more information). Then you move down to play a similar pattern starting one string lower (B, G, D string). This continues to another string lower (G, D, A string) and finally the same pattern at the lowest strings (D, A, E). Please use alternate picking at all times!
Video 2: A-shape D major / D minor triad arpeggio's
In this exercise you will have the same patterns but then played a bit higher on the fretboard, at the A-shape position. Remember to use alternate picking at all times!
Video 3: E-shape D major / D minor triad arpeggio's
In this exercise you will have the same patterns but then played again a bit higher on the fretboard, at the E-shape position. And once again use alternate picking at all times!
How to implement the exercises
Well, what to do when you play these exercises. First of all, this exercise is not primarily build to achieve extreme alternate picking skills or any other technique. It is based on actually seeing while playing which note of the chord you are actually playing (so root, major/minor third or perfect fifth).
By learning this exercise actually quite slowly (always use a metronome while practicing), and thinking (or even speaking) with each note you pick whether you are picking the root, major/minor third or perfect fifth will establish after a while good knowledge where these essential basic building blocks for chords are located on all the strings for that position on the fretboard. Remember, it's not important to play these exercises at crazy speeds at this time!
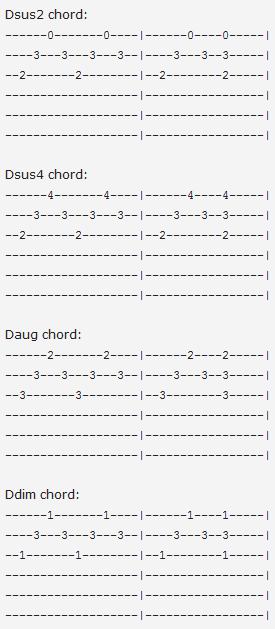
Secondly, once you have established enough knowledge regarding the position of the major/minor third and the perfect fifth in relation to the root note (for all the chords: 3 positions x 4 string combinations = 12 chords for D major & 12 chords for D minor), you can yourself expand the chord knowledge by adapting the exercise to include besides D major / D minor also the following chords: Dsus2, Dsus4, Daug, Ddim
What are those chords build from:
Dsus2: root (1), major second (2) and perfect fifth (5)
Dsus4: root (1), perfect fourth (4) and perfect fifth (5)
These so-called suspended triad chords are basically replacing the third by either a second or a fourth.
Daug: root (1), major third (3) and augmented fifth (#5); This augmented chord is based on D major but with an augmented (sharp) fifth.
Ddim: root (1), minor third (b3) and diminished fifth (b5); This diminished chord is based on D minor but with an diminished (flat) fifth.
As an example, below these 4 chords are shown in tab for the first D major chord we played in video 1:
You should be able to figure out yourself the same changes for all the other positions.
Finally, I have only used the D chords in this exercise as an example,but you can use the same patterns all over the fretboard by shifting the patterns up and down (e.g. 2 frets up to play the E chord). A good exercise to find the appropriate chords you would like to play, is by using a standard chord progression (e.g. a standard blues scheme (I – IV – V), and force yourself to not play two times the same shape (C, A or E shape) of one of these chords in the progression (so when switching from I to IV (e.g. D to G) you should switch from C-shape to e.g. A-shape. In this beginning this will be rather difficult to do, but the longer you try it, it will get better.
Last words
Although the information shown to you in this lesson may be seen as rather boring and quite a lot (at least I had that feeling the first time Icame into contact with it ![]() , you will certainly notice that the longer you play, this basic knowledge will certainly help you to become a more versatile guitarist with sufficient possibilities to play chords all over the fretboard, use very minimal chords shapes (only 3 strings) to spice up your playing and to instantly change a certain chord during improvising. Furthermore,this basic chord/fretboard knowledge is also very helpful for developing your solo guitar abilities.
, you will certainly notice that the longer you play, this basic knowledge will certainly help you to become a more versatile guitarist with sufficient possibilities to play chords all over the fretboard, use very minimal chords shapes (only 3 strings) to spice up your playing and to instantly change a certain chord during improvising. Furthermore,this basic chord/fretboard knowledge is also very helpful for developing your solo guitar abilities.
In one of my future lessons, I would like to cover a bit more advanced topic on how you can see e.g. in each of these patterns several other chords at the same time. For example any of the D minor triads you learned in this lesson can also be used as a Bbmaj7, F6 or an G9 chord (but of course not using all the individual notes of those chords). I won't go into detail on this now, as the above is enough information for now. But just imagine at a certain moment how much your chord database will be increased in by using exactly the same shapes ![]() .
.
I hope you liked my lesson, and any comments, points for correctionand/or suggestions for improvement are more than welcome!
I would also be more than happy to explain in more detail any of theaspects covered above of course ![]() .
.
Roger
Attached File(s)
SI_Lesson___Triads_C_shape.gp5 ( 5.76K )
SI_Lesson___Triads_A_shape.gp5 ( 3.72K )
SI_Lesson___Triads_E_shape.gp5 ( 3.72K )
