

Setting Up A Project In Reaper |
 GMC Forum > Discussion Boards > VINTAGE GMC > Community Activities and Tutorials > Recording > Recording & Mixing Classes
|
|
|
|
Oct 3 2007, 02:36 AM

|
|
Setting up a project in Reaper – project settings and templates
Introduction and file management Reaper, in common with most software sequencers, allows you to organize your recording, editing and processing parameters and takes in to a project. So if, for instance, you were working on a song all the settings about how Reaper is laid out and configured etc can be stored together as a project which can be recalled at a later date and even used as a template of settings that you can use for other recordings. To start with it can be helpful to understand what some of the file formats in Reaper are and to know where they are stored. When you installed Reaper you may have told it where the install directory should be placed on your computer or you may have accepted the default. The latter is c:\program files\ reaper. If you chose a different location then you can replace this path with the one that locates your installation. As an example, when I installed Reaper on my music PC I installed it to my hard drive labeled J (Music files) so here I would replace C:\program files\reaper with J:\program files\reaper. Reaper likes to keep things reasonably tidy and will store most files created with Reaper or those directly associated with it in the main Reaper folder. For instance, if I navigate to J:\Progam Files\ and open the Reaper folder on my pc I find that it contains, amongst other things, several folders: Color Themes; Data; Effects; Keymaps; Plugins; and ‘BradSucks_making me Nervous (the Reaper demo song). Some of the more important or interesting files that are in my Reaper folder are my License file (text and RTF); the Reaper-Install configuration; the Reaper Application launch file. Now if I open the Color Themes folder I find that it contains more folders and also some files (ReaperTheme files to be precise). If I download any more themes to use with Reaper they should also be stored in this same folder. There are also a lot of wav files in my main Reaper folder – all the waves created by Reaper when I’ve used it to record! (Unlike Reaper I’m not as fastidious in my file management. Sooner or later though I’ll get around to storing these in there own sub-folders.) Of note here is that all of Reaper settings, preferences and custom files are stored as text – even the Reaper project files (file extension *.RPP). That means you can open and edit any of them with a text editor if you really had to. (Personally I wouldn’t advise it but if you must make backup of the unedited file first so that you can revert to it if things go wrong!) A word of caution – do not try to open or edit files of the type ‘.exe’ or ‘.dll’. One thing of note here is that for those of us who have virtual software effects and/or instruments these will not be stored in the Reaper/Plugins or the Reaper/Effects folders. If you need to use these older VSTs/VSTIs then you need to set up Reaper to find them (see the Getting Started with Reaper lesson.) The Reaper Screen Below is a screenshot of Reaper 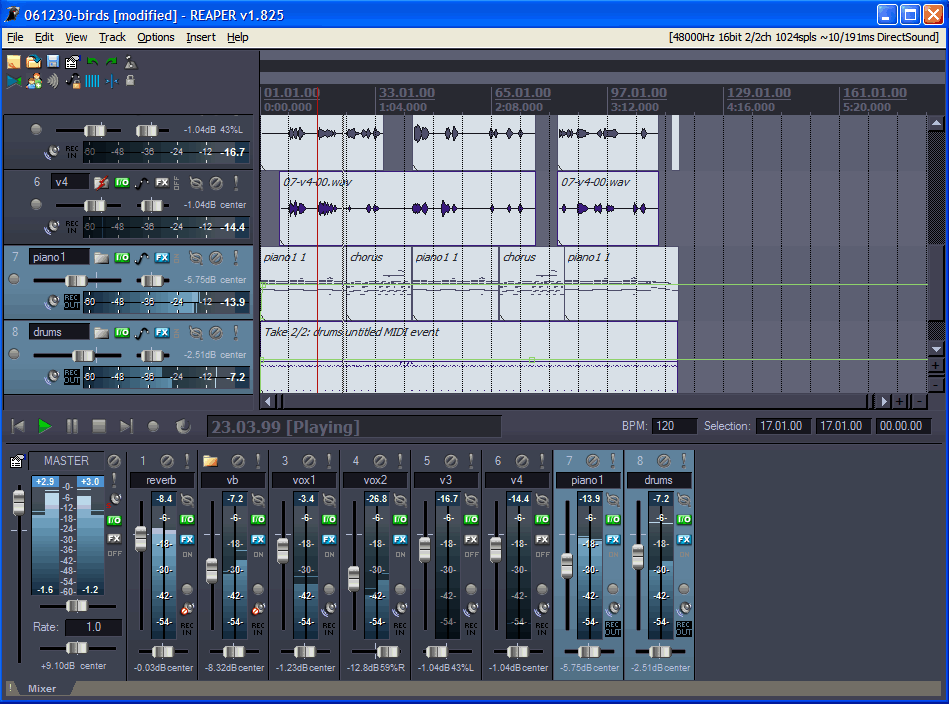 The Screen is divided in to several areas. In the title bar is the name of the open project, the version of Reaper and its status (Mine for instance reads Registered (Licensed only for non-commercial use). Immediately below this running from left to right is the Main Menu field. This contains a drop down menu based on the commands File, Edit, View and so on. At the far right of the Main Menu is a read out that provides information on the estimated latency and recording settings. Just below the Main Menu are the Main Window Toolbar on the left hand side and the Main Window and Edit Area on the right (the main Window area can contain audio, midi and video clips or files that make up your project). My Main Window Toolbar has 14 tools or apps including ones for New Project, Save, Project settings in the first row of 7 and Auto crossfade, Ripple editing and Lock in the second. (We’ll cover these properly when we start to discuss recording and editing.) If I insert a track to record to (Track>Insert New Track) a track control panel will appear in the area below the Main Window Toolbar – one for each track that is inserted. Each track control panel is numbered sequentially and can also be named. The panel has slider controls to set volume (large slider) and panning (small slider) and switch between record status (ie mute, solo and record). Below this area is a transport control with controls for, for instance, return to start, start, pause, stop, go to end of project, record, repeat. There is a digital readout of current position of the cursor in the track, the playback rate, tempo and the start and end settings of any loop we may have set. The final section below the transport contains the mixing console. Opening and setting a project In the Main menu in Reaper go to File> and chose either ‘New Project’ to start a new project or ‘Open Project’ to open an existing one. (You could for instance open the All through the Night.RPP project. If you do and you make changes to it you should then save it with a new name.) When you create your first project it is also a good idea to create and save a blank template – one that contains your minimum set of preferences – it’s often easier to add to basic default settings then to remember to change them. I find that I’m more likely to remember to do things if I have to add them to a basic layout but often forget to undo things until it’s too late. (The number of times I’ve been part way through a recording session only to realize that I’m using a setting with the bit rate of 32 and frequency of 92kHz instead of 24 and 44.1!) Now go to File>Project Settings – this has three tabs, Audio Settings; Project Settings, and; Notes. Leave the Audio Settings Tab for now and click on the Project Settings tab. In the Project Settings you can set your preferred a default for the tempo and time signature (Reaper default is 120 BPM and 4/4). You can also set whether events, markers and envelops (see a later lesson on recording and editing) are attached to Time or Beat; a Preferred Frame Rate; an option to limit a project length and recording time. Leave these as their defaults for now. There is an option to allow feedback in routing (I’ll discuss this in a lesson routing) – do not select this yet. Select or tick the ‘Automatically mute master output’ option and for now leave the setting at 18dB. This option will automatically kill sound in Reaper if it exceeds the stated level – something that can save your audio equipment and ears if things go wrong! Leave the ‘Default track pan law’ at the 0.0dB setting for now. Again I’ll talk about panning laws in a future lesson (sorry all I’m getting a bit repetitive). Briefly though when a mono signal is panned across a stereo field gain can occur in the left channel and attenuation in the right audio channel, or vice versa. The panning laws are concerned with compensating for this – or in some instances using it to our advantage. Click the Notes tab and tick the ‘Show notes’ option. Any notes you enter will now be automatically be displayed whenever you launch these project settings in Reaper. Enter any notes you might want (Mine reads – ‘Master template setting for multitrack recording’) and then click the ‘Save as default project settings’ button. Using more than one project setting – templates There are times when a single project setting won’t do. For instance I find that I use a rather different basic layout if I’m recoding basic jam along/learning guitar backing tracks for my own use then if I’m recording a song or for recording for radio. Each one of these three for me has their own basic settings, the number of tracks, the bit depth, whether the ruler is in mins:secs or beats and so on and it’s often nice to be able to recall them instantly. In Reaper you can create and use more than one set of project settings, saving each as a different project template that can be recalled as and when you need it. If you open a template that you have created Reaper will recall the screen layout, how many tracks are open, what views and devices are open, and how they are sized and placed along with your audio settings. Once you have set up Reaper as you like it you can create a template by opening File>Project Template>Save as Project Template. Enter a suitable name and click Save. To open a file based on a template go to File>Project Template and click on the name of the one you want. Getting ready for a first recording Set up Reaper with the preferences that you prefer. Now open (or if you don’t have one create it) a project template. Before you do anything else you need to protect your ears and equipment. Here’s how to set the input: 1) Turn the input or gain on your audio device to zero. 2) For recording a guitar – plug it in to the HiZ input on your audio device. (Or if you are mic’ing then connect the mic to the correct xlr input.) 3)Turn the guitar’s volume to max - or your max setting plus about 10% (and if mic’ing turn on your amp and set its controls to what you will record at). 4) Now audition the guitar (or mic’ed guitar and amp) by slowly turning up gain control/fader on your audio device until it just clips. 6) Back off your guitar (or amp) from its setting by about 10%. 5) Slowly opening up the fader in Reaper until you get to a suitable volume. If Reaper reaches clipping back it off about 3dB. Once set you have completed your setup! Note if your audio device has a clip meter then first do steps 1 and 2. Then adjust until clipping just occurs and then reduce the input slightly. On my mixing console I have a clip meter for each channel and a gain control. My clip meter is green when everything is ok and goes bright red when clipping occurs. I increase the gain control until the meter just turns red and then I back it off a few degrees. To do this I usually play some 6 string chords with a fair bit of force – even though I tend to play lightly, I’m cautious and hate digital clipping. (Note a heavily strummed chord will produce a stronger input signal then a single note so check the signal by playing several different tunes in the style that you normally play at. If you’re Pete Townsend there’s no point in setting the input level by playing a delicately finger picked song!) Now follow with steps 4 and 7 (miss out 6). Coming up – a first recording; routing and the buss; things you never knew - and maybe never wanted to know - about mics and mic'ing Cheers, Tony This post has been edited by tonymiro: Oct 3 2007, 03:03 AM -------------------- Get your music professionally mastered by anl AES registered Mastering Engineer. Contact me for Audio Mastering Services and Advice and visit our website www.miromastering.com
Be friends on facebook with us here. We use professional, mastering grade hardware in our mastering studo. Our hardware includes: Cranesong Avocet II Monitor Controller, Dangerous Music Liasion Insert Hardware Router, ATC SCM Pro Monitors, Lavry Black DA11, Prism Orpheus ADC/DAC, Gyratec Gyraf XIV Parallel Passive Mastering EQ, Great River MAQ 2NV Mastering EQ, Kush Clariphonic Parallel EQ Shelf, Maselec MLA-2 Mastering Compressor, API 2500 Mastering Compressor, Eventide Eclipse Reverb/Echo. |
 |
 
|
|


|
|
|
|
Oct 3 2007, 07:51 AM

|
|
Thanks tony.
|
|
|
|
|

|
|
|
|
Oct 3 2007, 10:18 AM

|
|
Nice!
-------------------- Check out my Instructor profile
Live long and prosper ... My Stuff: Electric Guitars : Ibanez Jem7v, Line6 Variax 700, Fender Plus Strat with 57/62 Pickups, Line6 Variax 705 Bass Acoustic Guitars : Taylor 816ce, Martin D-15, Line6 Variax Acoustic 300 Nylon Effects : Line6 Helix, Keeley Modded Boss DS1, Keeley Modded Boss BD2, Keeley 4 knob compressor, Keeley OxBlood Amps : Epiphone Valve Jnr & Head, Cockburn A.C.1, Cockburn A.C.2, Blackstar Club 50 Head & 4x12 Cab |
|
|
|
|


|
|
|
|
|
Oct 4 2007, 06:33 AM
|
|
QUOTE (jeff @ Oct 3 2007, 03:23 PM)  Tony, I really like this approach to Reaper that you are preparing. I was wondering if you were going to explain the "Save Project" option in your next post. I have learned that it is good for me to select the option of "Create subdirectory" and "Copy all media" or "Move all media" and "trim media" options because it keeps my projects organized. But I'm not sure what all of the advantages and disadvantages are. I don't know what "trim media" means either so if you are thinking of expanding on that, I believe it would be very helpful. Thanks Tony!! This is great!  I'll do my best Jeff (I need to check my understanding as well though  ). Got a dreadful memory though so kick me hard just in case I forget. ). Got a dreadful memory though so kick me hard just in case I forget.Cheers, Tony -------------------- Get your music professionally mastered by anl AES registered Mastering Engineer. Contact me for Audio Mastering Services and Advice and visit our website www.miromastering.com
Be friends on facebook with us here. We use professional, mastering grade hardware in our mastering studo. Our hardware includes: Cranesong Avocet II Monitor Controller, Dangerous Music Liasion Insert Hardware Router, ATC SCM Pro Monitors, Lavry Black DA11, Prism Orpheus ADC/DAC, Gyratec Gyraf XIV Parallel Passive Mastering EQ, Great River MAQ 2NV Mastering EQ, Kush Clariphonic Parallel EQ Shelf, Maselec MLA-2 Mastering Compressor, API 2500 Mastering Compressor, Eventide Eclipse Reverb/Echo. |
|
|
|
|
|
|
|
|
|
Oct 4 2007, 07:23 AM
|
|
*kick*
Not sure if you forgot or not but couldn't resist
-------------------- Check out my Instructor profile
Live long and prosper ... My Stuff: Electric Guitars : Ibanez Jem7v, Line6 Variax 700, Fender Plus Strat with 57/62 Pickups, Line6 Variax 705 Bass Acoustic Guitars : Taylor 816ce, Martin D-15, Line6 Variax Acoustic 300 Nylon Effects : Line6 Helix, Keeley Modded Boss DS1, Keeley Modded Boss BD2, Keeley 4 knob compressor, Keeley OxBlood Amps : Epiphone Valve Jnr & Head, Cockburn A.C.1, Cockburn A.C.2, Blackstar Club 50 Head & 4x12 Cab |
|
|
|
|
|
|
|
|
|
Oct 4 2007, 07:32 AM
|
|

-------------------- Get your music professionally mastered by anl AES registered Mastering Engineer. Contact me for Audio Mastering Services and Advice and visit our website www.miromastering.com
Be friends on facebook with us here. We use professional, mastering grade hardware in our mastering studo. Our hardware includes: Cranesong Avocet II Monitor Controller, Dangerous Music Liasion Insert Hardware Router, ATC SCM Pro Monitors, Lavry Black DA11, Prism Orpheus ADC/DAC, Gyratec Gyraf XIV Parallel Passive Mastering EQ, Great River MAQ 2NV Mastering EQ, Kush Clariphonic Parallel EQ Shelf, Maselec MLA-2 Mastering Compressor, API 2500 Mastering Compressor, Eventide Eclipse Reverb/Echo. |
|
|
|
|


|
|
|
|
|
Oct 17 2007, 11:40 PM
|
|
QUOTE (PacmanProductions @ Oct 14 2007, 02:04 AM) hey tony, how can i set it up so it records out of my amp... not my webcam? Not sure what you mean here Pacman... Maybe not helped as I've never used a webcam Cheers, Tony -------------------- Get your music professionally mastered by anl AES registered Mastering Engineer. Contact me for Audio Mastering Services and Advice and visit our website www.miromastering.com
Be friends on facebook with us here. We use professional, mastering grade hardware in our mastering studo. Our hardware includes: Cranesong Avocet II Monitor Controller, Dangerous Music Liasion Insert Hardware Router, ATC SCM Pro Monitors, Lavry Black DA11, Prism Orpheus ADC/DAC, Gyratec Gyraf XIV Parallel Passive Mastering EQ, Great River MAQ 2NV Mastering EQ, Kush Clariphonic Parallel EQ Shelf, Maselec MLA-2 Mastering Compressor, API 2500 Mastering Compressor, Eventide Eclipse Reverb/Echo. |
|
|
|
|
|
|
|
|
Oct 18 2007, 02:46 AM

|
|
Nice. I look forward to more Reaper lessons.
|
|
|
|
|
|
|
|
|
|
Oct 19 2007, 06:43 AM
|
|
Think Jeff is right here - if so you need to tell Reaper to point to your soundcard as the audio out Pacman. (Should be Options.Preferences.Audio Device.Audio output - or something very similar - not got Reaper up on here atmo)
Cheers, Tony -------------------- Get your music professionally mastered by anl AES registered Mastering Engineer. Contact me for Audio Mastering Services and Advice and visit our website www.miromastering.com
Be friends on facebook with us here. We use professional, mastering grade hardware in our mastering studo. Our hardware includes: Cranesong Avocet II Monitor Controller, Dangerous Music Liasion Insert Hardware Router, ATC SCM Pro Monitors, Lavry Black DA11, Prism Orpheus ADC/DAC, Gyratec Gyraf XIV Parallel Passive Mastering EQ, Great River MAQ 2NV Mastering EQ, Kush Clariphonic Parallel EQ Shelf, Maselec MLA-2 Mastering Compressor, API 2500 Mastering Compressor, Eventide Eclipse Reverb/Echo. |
|
|
|
|

|
|
|
|
|
Mar 7 2008, 05:47 PM
|
|
Hi Somecrazyguy09
- one possibility that springs to mind is that Reaper saves a project not as one mp3 but as the mp3 and also a set of associated files that contain info that Reaper reads in order to build info about settings used etc. Some of these additional files may look like an mp3 file but actually have a longer file name - usually something like XXX.mp3.asd. (you may not notice/see the final .asd tag if you hover over the file). It's possible that you're trying to upload one if these .mp3.asd files in which case you'll hit problems. Cheers, Tony -------------------- Get your music professionally mastered by anl AES registered Mastering Engineer. Contact me for Audio Mastering Services and Advice and visit our website www.miromastering.com
Be friends on facebook with us here. We use professional, mastering grade hardware in our mastering studo. Our hardware includes: Cranesong Avocet II Monitor Controller, Dangerous Music Liasion Insert Hardware Router, ATC SCM Pro Monitors, Lavry Black DA11, Prism Orpheus ADC/DAC, Gyratec Gyraf XIV Parallel Passive Mastering EQ, Great River MAQ 2NV Mastering EQ, Kush Clariphonic Parallel EQ Shelf, Maselec MLA-2 Mastering Compressor, API 2500 Mastering Compressor, Eventide Eclipse Reverb/Echo. |
|
|
|
|
|
|
|
|
May 28 2008, 05:52 PM

|
|
Very helpful and informative
Thanks T -------------------- |
|
|
|
|
|
|
|
|
May 29 2008, 04:58 AM

|
|
Great Tony,thanks for this.
-------------------- |
|
|
|
|
 
|
1 User(s) are reading this topic (1 Guests and 0 Anonymous Users)
0 Members:


