Build Your Own Effects Pedal
m (→Build Your Own Effects Pedal) |
|||
| Line 14: | Line 14: | ||
The first thing to do when preparing to build is download the instructions and parts list. It's very important to check the parts list carefully and make sure you have everything before you begin. It's not a bad idea to read completely through the instructions before starting just to familiarize yourself with what you will be doing. | The first thing to do when preparing to build is download the instructions and parts list. It's very important to check the parts list carefully and make sure you have everything before you begin. It's not a bad idea to read completely through the instructions before starting just to familiarize yourself with what you will be doing. | ||
| - | In this picture I have my parts laid out, and I have grouped all the resistors and labeled them, because they are color coded and it's much faster if you have them sorted. It's recommended you verify the values of the resistors with an ohmmeter, because these are small metal film resistors and the color bands are quite small, and the blue, black and brown tend to look very similar, especially if your eyes aren't so young. The instructions call for you to put in all the resistors, then all the diodes, etc. So what I did was put all the | + | In this picture I have my parts laid out, and I have grouped all the resistors and labeled them, because they are color coded and it's much faster if you have them sorted. It's recommended you verify the values of the resistors with an ohmmeter, because these are small metal film resistors and the color bands are quite small, and the blue, black and brown tend to look very similar, especially if your eyes aren't so young. The instructions call for you to put in all the resistors, then all the diodes, etc. So what I did was put all the resistors on the board in their clearly labelled positions, then turned the board over and soldered all the leads. Then I clipped the excess leads and proceeded to the next part type. A word of '''warning:''' when clipping the excess leads, do not twist as you cut, or you will pull the pad off the board and ruin it. |
| - | + | ||
| - | + | ||
=Tools= | =Tools= | ||
Current revision
Build Your Own Effects Pedal
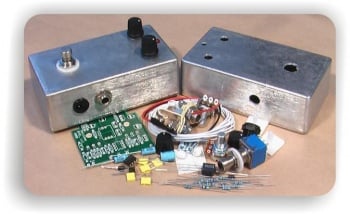
Building your own effects pedals is fun and rewarding way of adding to your arsenal of guitar effects. There are several companies selling kits of various pedals, the best known is Build Your Own Clone. They sell a variety of clone kits for popular pedals, their most well known is probably the B.Y.O.C. Large Beaver, which is a clone of the famous Big Muff. The kit includes parts to build either the "Triangle" or "Ram's Head" versions, and has been reviewed by many people. Another interesting one is the clone of the Proco Rat which features the classic circuit and 5 other distortion modes making it a truly versatile pedal.
The pedal kits range in difficulty from very easy to quite complex. It helps to have experience in soldering or building kits, but if you don't have any experience, first time buyers get a free confidence builder kit to practice on. Most all of the kits have mods that can be made if desired, just check the forum for that kit and you'll see what people have done with it.
For my project I chose the Opticomp optical compressor which is a clone of the MXR Dynacomp. The price for the kit is $69.99 USD. It's a good one for beginners because of the low parts count. As the name implies it is an exact clone. The only modification I have seen for this one is adding a second LED to indicate the level of compression being applied. Since this pedal tends to be a "set it and forget it" type, I chose not to add the second LED.
The first thing to do when preparing to build is download the instructions and parts list. It's very important to check the parts list carefully and make sure you have everything before you begin. It's not a bad idea to read completely through the instructions before starting just to familiarize yourself with what you will be doing.
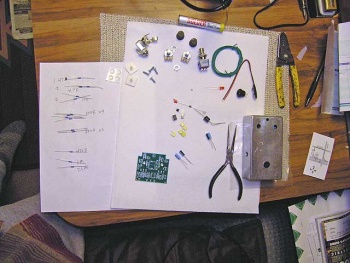
In this picture I have my parts laid out, and I have grouped all the resistors and labeled them, because they are color coded and it's much faster if you have them sorted. It's recommended you verify the values of the resistors with an ohmmeter, because these are small metal film resistors and the color bands are quite small, and the blue, black and brown tend to look very similar, especially if your eyes aren't so young. The instructions call for you to put in all the resistors, then all the diodes, etc. So what I did was put all the resistors on the board in their clearly labelled positions, then turned the board over and soldered all the leads. Then I clipped the excess leads and proceeded to the next part type. A word of warning: when clipping the excess leads, do not twist as you cut, or you will pull the pad off the board and ruin it.
Tools
Tools needed are at minimum some needle nose pliers to bend the leads to fit the circuit board, and a small diagonal cutter for trimming the excess leads after soldering. You will want to use a small diameter, rosin core solder since the work is quite small. You can see the solder I used in the picture, it comes in a tube and is about the size of small wire. If you don't have a soldering kit, you can get nice soldering stations on Ebay for about $25USD. A station is nice because it gives you a place to rest the hot iron when not being used and you don't burn yourself or set the carpet on fire.
The only problems to report with this kit is that the solder pads for the 3 electrolytic capacitors were very close together making it hard not to bridge them with solder, which will definitely cause your kit not to work.
Finished project
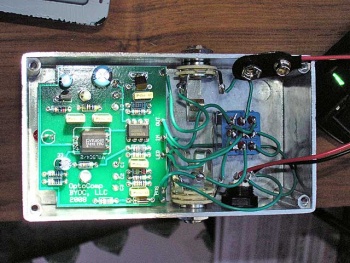
Here is the finished pedal. All that's needed now is a fancy paint job, or at least some decals. I plan to build at least one more so I will paint them both at the same time (yeah right!). The pedal uses a 9 volt battery or a standard Boss type 9 volt power supply. The new compressor works as expected, providing a nice clarity to the sound. Most people use these with the knobs at 1:00 and 11:00 for the Level and Compression respectively. It is capable of severe limiting if you crank up the compression. This is not a sustainer type of compression.
My total build time for this project, about 3 hours, which included about a half hour of double checking and re-reading to make sure everything was correct. You might ask why bother to do this since the kit price isn't exactly cheap. I can report it's very satisfying to have built your own pedal so that you have a "hand made" version of a popular pedal. If you're creative with the paint job, people will ask you "Where did you get that?" and you can say "I MADE IT!"
