Creating a video Lesson
(→Video Editing Software & syncing the Audio) |
|||
| Line 1: | Line 1: | ||
| + | [[Category:Techniques]] | ||
[[Image:clapper.jpg|thumb|200px|right|Lets shoot some video!]] | [[Image:clapper.jpg|thumb|200px|right|Lets shoot some video!]] | ||
Current revision
This article should help those interested in recording and writing their own video lesson. This is based on my experience recording recent lessons for the Student Instructor Board with some problems that I encountered and how I over came them, so hopefully if you are thinking about recording your own lessons you wont have to go through some of the painful and frustrating moments that I`ve had.
Contents |
The Camera
Probably the most essential item of course when wanting to do a "video" lesson!
Most digital cameras these days have a video shoot facility, this is one work around but I decided (not just for lessons) to buy a camera designed for movies only (although it does have "still" etc capabilities) It also has a really handy remote control pad that has proved invaluable, so I highly recomend getting a camera that has a remote control function with it also.
When buying your camera you need to consider how exactly you are going to shoot your videos, will you be shooting video seperatly and syncing the audio from another source? or will you be recording maybe via USB of Firewire.
Lets Try out the camera!
My original thoughts where to shoot video via USB using a program on the PC like Windows Movie Maker (or something similar), the biggest problem with this that I found was that although the camera was of good quality and capable of recording video in HD720dp the results where very poor, the main reason was that Windows Movie Maker seemed to only recognise the camera as a "webcam" and adjusted its properties accordingly, I also found this with other programs too.
So, thinking that things where going to be a little simpler I decided to go down the route of shooting video then syncing the audio that I was recording seperatly onto my PC with the video footage.
After a few trial runs I quickly ran into another problem .... Lighting!! Something that I will come back to a bit further into this artcile.
Audio
Now disounting Windows Movie Maker I decided to carry on using "Reaper" (Can be downloaded here)as my audio recording platform, a great simple to use program, that is free to try and very cheap to buy a license for (around $50)
I`ve been using Reaper for a little while so audio was not going to be a problem what so ever, its a simple case of hitting record on the camera then hitting record in Reaper and off you go! (the syncing part comes later)
once a video take has been succesful simply save the solo or riff that you are doing for the lesson then render the whole thing as an mp3 ... simple!
Lighting!
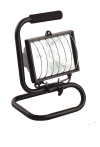
Lighting for digital cameras I`ve found is probably the most important part of getting the quality really good for your lesson, I started by taking the lampshade off of the room light and putting in a higher wattage bulb (bearing in mind that almost all my recording is done at night), this was far too dark and gave a lot of "graining" on the video with also a slight yellow hint, I then tried a desklamp as well, this much improved the lighting issue but still wasnt to my satisfaction, eventually after speaking with someone (Andrew Cockburn) a "Halogen Floodlight" was suggested, so on a trip to the hardware store I found a portable 150watt Halogen floodlight that was very cheap (around £14 UK, $28 approx, when recording my lessons now the room is more or less a pure bright white! perfect!! (saves on heating too! warms the room up a treat!!)So lighting issue solved, the positioning of the light does has an effect on the video, I tend now to position the floodlight fairly high up in one corner of the room and angle it towards the centre of the ceiling, the ceiling being white reflects the light quite nicely and evenly throughout the whole room, the added bonus to this also is that "shadows" are reduced quite significantly.
Background
Fortunatly I already have plain walls in the room I am using, at the moment I have one plain wall behind me, I do have to strategically place where I sit so that the door that is directly behind me is not in shot, but apart from that it works fairly well, soon I will be using a backdrop behind me so that I can be a little more comfortable when recording without having to worry if the door can be seen or not.
So the first Video take is complete!
So with all the lighting issues sorted I was now ready to shoot my first real take of my planned first lesson.
I positioned the camera on a chair and raised it up using a box so that it was at a level that in the viewing window all that could be seen was the guitar (the camera does have a threaded hole to take a stand but not something I require, it has a good connectivity station (also used for charging) that it sits in and keeps the camera steady), this was probably about the easiest part of the whole process, Reaper is set up with my backing track and a track "armed" for recording the solo I`m going to play, I hit record on the camera first and the hit record in Reaper, be sure to leave a reasonable gap before your backing track starts playing to give you a chance to settle into your seat or stool properly!
The solo is finished and its gone ok, good enough to be a take!, when I finsh the solo or riff I sit still for just a few seconds, this will allow me to do some editing touches later on!
Then I stop recording video and audio, and transfer the video file from my camera to a location on my PC (I use a New Folder for each lesson) then render my reaper file to mp3 and save it to the same folder location as the video (this will help with finding all the right bits for the lesson later)
Video Editing Software & syncing the Audio
This is the most time consuming part of the process, you need a decent program to edit your video and sync your audio, there are many Video editing suites available, I got some bundled software with my camera and they included a full licensed copy of Adobe Premier Elements, being a complete novice with this software and all other video editing software it was a case of trial and error in using it.
Fortunatly I dont find it too difficult to work with, there are probably much easier programs to use but this does the job quite nicely in my opinion
So I now import my video file into "Premier Elements" and drag it on to the timeline at the bottom, I then do the same with my rendered mp3 and drag it into one of the available "audio" tracks in the timeline.
I start by dragging them to the same starting point, (they of course will be out of sync with each other at the moment) I then expand the view so I can see the wave outline from the audio taken by the cameras built in microphone and the peaks etc are much more visible on my imported mp3 track as well.
At the beginning of each recording I usually do a small "rake" accross the strings, this shows up as a high peak on the rendered "Reaper" file and on the video audio also, I drag the mp3 audio so that the two peaks are in line and do a realtime "play" I turn the volume down slightly on my mp3 audio and turn the Video audio up full, I can then hear if the two are sync`d in together, if they arent then you will be able to tell which direction to drag the audio to get them in sync nicely.
With the video and audio nicely sync`d I can now start editing the video, I cut the beginning to where I`m (hopefully) sitting still and the end to the point I mentioned earlier where again I`m sitting still.
With a simple click in the effects toolbar I add fade in (from black) and fade out (to black) you can change the exact point where you want the fade in/out to start from, also I zoom in using the software and position the frame to the point that shows the most, the fretboard,fretting & picking hand
Important : remember to turn the Video`s audio "off" and raise the volume of the mp3.
This will save a horrible "re render" process!
Rendering the Video
Now I`m in a position to render my video putting all the pieces together, choosing the right codecs etc unfortunatly is a time consuming and a "trial and error" process, I eventually settled with rendering my videos to .mpegs, the files are not too large (remember people have to download them from the forum and my not want to download a huge file, also you have to upload that file to the forum!) and the video quality is pretty good too
I plan later to trial some more codecs but at the moment I`m happy with the mpegs quality
The rendering process takes some time, depending on the size of the video it can take (on my PC) up to an hour to render, this is why its so important to make sure I`ve done all the things correctly before rendering, so I check, double check and check again before hitting "Export Video"
GMC Video Lesson Tutorial
A fantastic Video Lesson Tutorial has just been released by David Walliman, Muris and Gabriel, I highly recomend watching these if you plan on doing some lessons, they cover some of the topics that I`ve described above brilliantly!
