Secrets of Building Killer Tone In Software
| (14 intermediate revisions not shown.) | |||
| Line 1: | Line 1: | ||
| + | [[Category: Gear]] | ||
| + | [[Category: Theory]] | ||
| + | |||
| + | |||
'''SECRETS OF BUILDING KILLER TONE IN SOFTWARE!''' | '''SECRETS OF BUILDING KILLER TONE IN SOFTWARE!''' | ||
| - | '''(Overloud TH2)<br> | + | '''(Overloud TH2)'''<br> |
| - | PART 1 of 4''' | + | |
| + | ''An article by Todd Simpson'' - [https://www.guitarmasterclass.net/guitar_forum/index.php?showtopic=52594 Forum Thread] | ||
| + | |||
| + | ==PART 1 of 4== | ||
| + | |||
| + | You ever wonder why it sounds amazing when some folks make patches in guitar plugins? And sometimes it sounds less than amazing when other folks do it? There are some tips that will help get you towards TONE NIRVANA without taking endless hours away from your practice time!!! | ||
| + | |||
| + | I"m going to break down on patch and you can use these techniques in ANY PROGRAM that contains basic effects. If the program you are using does not contain effects, time to grab one that does __IPBWIKI_IMG_HTTP__www.guitarmasterclass.net/guitar_forum/style_emoticons/default/smile.gif__IPBWIKI_IMG_HTTP_END__ The usual suspects are guitar rig free amplitude free, sgear demo, TH2 demo, (I'm not going to mention lepou as it's without effects) so let's dig in! | ||
| + | |||
| + | Step 1. BEFORE YOU HIT YOUR AMP/HEAD!!! | ||
| + | |||
| + | [[Image:sec1.jpg|600px]] | ||
| + | |||
| + | -Take a look at the screen grab above. Here is what's happening in it. | ||
| + | |||
| + | '''THE SIGNAL CHAIN''' | ||
| + | |||
| + | '''PARAMETRIC EQ''' (Variable Equalizer, Knobs instead of Sliders) | ||
| + | *The reason to put this FIRST in your chain is to shape the tone BEFORE it hits any other processing. Look at the numbers in red in the unit. I"m boosting a bit at 742hz which gives things punch and cutting/removing a bit at 155hz which is where all the HORRIBLE MUD lives. | ||
| + | |||
| + | '''VARIMU COMPRESSOR''' (A very pricey compressor that you can read more about at this link http://www.manley.com/mslc.php)<br> | ||
| + | -Look at the numbers in red. Very low "compression ratio" with a bit of "sustain". Essentially I'm using the compressor as a sort of booster so that I don't have to burn out my picking hand and it helps drive the gain. | ||
| + | |||
| + | '''GATE EXPANDER''' ( Just a fancy Noise Gate really.)<br> | ||
| + | -Both of them are there just to clean up the signal. | ||
| + | |||
| + | '''TUBE NINE''' ( A Tube Screamer Overdrive clone.)<br> | ||
| + | -Just like a Tube Screamer, it's there to act as a preamp and give more signal to the Amp/Head so that the drive section has more to work with and as a result, sounds MEANER! | ||
| + | |||
| + | '''CHR-2''' (Clone of a BOSS Stereo Chorus unit.)<br> | ||
| + | -Just a pinch of stereo chorus helps the tone sound big and wide and thick. | ||
| + | |||
| + | And that's it!!! Next time, THE AMP STAGE!!! | ||
| + | |||
| + | |||
| + | ==PART 2 of 4== | ||
| + | |||
| + | '''THE PRIMARY GAIN STAGE''' | ||
| + | |||
| + | Let's look at the AMP/HEAD gain stage. There are many ways to skin this particular cat, but here is a good place to start __IPBWIKI_IMG_HTTP__www.guitarmasterclass.net/guitar_forum/style_emoticons/default/smile.gif__IPBWIKI_IMG_HTTP_END__ | ||
| + | |||
| + | I'm using one of my fave amp heads in TH2. The "LYNCHBOX" from RANDALL. It's very versatile as it's a modular head. You can select any one of a number of different preamps for it from a drop down. As you can see, I'm using the "ULTRA XL" preamp which is based on the legendary ULTRA XL Module that is no longer made and much sought after. Which is why I love accurate software sims __IPBWIKI_IMG_HTTP__www.guitarmasterclass.net/guitar_forum/style_emoticons/default/smile.gif__IPBWIKI_IMG_HTTP_END__ | ||
| + | |||
| + | [[Image:sec2.jpg|600px]] | ||
| + | |||
| + | Let's look at the settings. | ||
| + | |||
| + | '''PRE-AMP SETTINGS''' (mostly eq decisions here, trust your ears!) | ||
| + | |||
| + | -These are the settings for the Ultra XL Module Only<br> | ||
| + | GAIN: Gain is roofed smile.gif Of course.<br> | ||
| + | BASS: Bass about half but play with it and tweak to taste.<br> | ||
| + | MID: Mids about the same, tweak to taste.<br> | ||
| + | TREBLE: Treble a bit on the plus side to add bite to pick strikes and BRIGHT switch is on.<br> | ||
| + | LEVEL: is roofed which is just the preamp level. The master level controls the actual power amp that is in charge of volume. | ||
| + | |||
| + | '''AMP SETTINGS''' | ||
| + | -These are the settings for the Amp Section Only<br> | ||
| + | PRESENCE: Roofed to maximize the eq decisions.<br> | ||
| + | DENSITY: Zero. It can oversaturate the bass response pretty quickly so be careful.<br> | ||
| + | MASTER: About half but push it till it works __IPBWIKI_IMG_HTTP__www.guitarmasterclass.net/guitar_forum/style_emoticons/default/smile.gif__IPBWIKI_IMG_HTTP_END__ | ||
| + | |||
| + | The AMP STAGE is "FUN" stage IMHO, as you basically pick an amp you like and start turning knobs til your ears tell you that you've gotten it right. There are no digital readouts, no compression ratios, just knobs and switches the way God intended :9 | ||
| + | |||
| + | Next Up!!!! Something a bit more technical. THE CAB/MIC STAGE!!!! | ||
| + | |||
| + | |||
| + | ==Part 3 of 4== | ||
| + | |||
| + | '''GUITAR CABS & MICS''' | ||
| + | |||
| + | |||
| + | In PART III we are diving in to the wonderful world of Guitar Cabinets and Microphones __IPBWIKI_IMG_HTTP__www.guitarmasterclass.net/guitar_forum/style_emoticons/default/smile.gif__IPBWIKI_IMG_HTTP_END__ Much of this info will translate in to the real world so hang tight!!! | ||
| + | |||
| + | ''CHOOSING YOUR WEAPON!'' | ||
| + | |||
| + | Choosing your speaker cabs is a crucial part of building your tone. If you have not done so, try to load each and every speaker cabinet and play a bit to see what each sounds like. Each has their own character. For this example, I'm going to use the | ||
| + | |||
| + | ''RANDALL George Lynch "Lynch Box" Cab.'' | ||
| + | |||
| + | and two Microphones. The AMERICAN 52 and AMERICAN 57. First up! The cab. Then we will talk mics. | ||
| + | |||
| + | [[Image:sec3.jpg|600px]] | ||
| + | |||
| + | If you double click on the cabinet in TH2, you get the pop up "contextual menu" that you see in the screen grab above. This is the SECRET SAUCE to making your tone sound like a real guitar in a nice room with nice mics, vs a fizzy/buzzy/boomy mess __IPBWIKI_IMG_HTTP__www.guitarmasterclass.net/guitar_forum/style_emoticons/default/sad.gif__IPBWIKI_IMG_HTTP_END__ So tread easy, but with purpose __IPBWIKI_IMG_HTTP__www.guitarmasterclass.net/guitar_forum/style_emoticons/default/smile.gif__IPBWIKI_IMG_HTTP_END__ Let's go through the settings. | ||
| + | |||
| + | '''CABINET MODEL:'''<br> | ||
| + | This dropdown menu is where you pick your cab. Try them all! Each has it's own vibe. The best part is that you can mix and match. I typically use 2 cabs in every patch I make. It reduces the fizz/harshness typically associated with software sims in general and smooths out the top end response IMHO. But for now, just pick one you like. | ||
| + | |||
| + | -RESPIRE: The little button labled ReSPIRe is sort of like the loudness button on your stereo. It greatly enhances bass and a bit of treble. It works great when practicing, but you may want to turn it off during mix down as it can overwhelm bass frequencies in a mix. | ||
| + | |||
| + | '''MIC A MODEL:'''<br> | ||
| + | This dropdown menu is where you pick your microphone. There are many to choose from and like the cabs, each is somewhat unique in terms of sound. Try them all and see which ones you like best. You get two mics per cab so finding complimentary pairs is a must. For my MIC A I'm using the American57 which is a simulation of the classic SHURE SM57. | ||
| + | |||
| + | |||
| + | [[Image:sec4.jpg|600px]] | ||
| + | |||
| + | -MIC PLACEMENT: Once you select your mic, click and drag it around until you find a placement that you like. | ||
| + | |||
| + | '''AMBIENCE TYPE'''<br> | ||
| + | This dropdown allows you to give a little "ambience" to your tone. E.G. the sound of the room. So it let's the overall tone sound like it was recorded in a nice studio setting. Imagine the large drum room at a pricey studio with your amp sitting in the middle turned all the way up. __IPBWIKI_IMG_HTTP__www.guitarmasterclass.net/guitar_forum/style_emoticons/default/smile.gif__IPBWIKI_IMG_HTTP_END__ | ||
| + | |||
| + | '''MIC B MODEL:'''<br> | ||
| + | This is the dropdown for your second mic. The second mic should compliment the first. You will learn this by trial and error and by reading about it on the web/seeing vids etc. Certain mics work well together, some don't. I"m using a American52 which is a simulation of a SHURE SM52. This is typically used to mic Kick Drums and Bass Guitar, but I LOVE using it for guitar cabs along with a SM57. It grabs the lower range that the 57 just can't get. | ||
| + | |||
| + | [[Image:sec5.jpg|600px]] | ||
| + | |||
| + | '''MIX:'''<br> | ||
| + | This is sort of like a mini mixing board right here inside the plugin __IPBWIKI_IMG_HTTP__www.guitarmasterclass.net/guitar_forum/style_emoticons/default/smile.gif__IPBWIKI_IMG_HTTP_END__ Handy eh? Here you can control and blend the level of both mics. Also, you get a "Rear Mic" which is just to bring up the bass really as it's micing the back of the cab. Also, you get a free 45 degree mic which can add punch. You can put both of these at zero or mix them in to taste. | ||
| + | |||
| + | Once you are done tweaking, '''SAVE YOUR PRESET!!!''' __IPBWIKI_IMG_HTTP__www.guitarmasterclass.net/guitar_forum/style_emoticons/default/smile.gif__IPBWIKI_IMG_HTTP_END__ | ||
| + | |||
| + | NEXT UP!!!! The wonderful world of POST PROCESSING!! | ||
| + | |||
| + | |||
| + | ==Part 4 of 4== | ||
| + | |||
| + | Now for our final installment. '''POST PROCESSING!!''' This is what happens AFTER the AMP/HEAD and Mic/Cabinet decisions. Here is a screen grab of the post processing rack and the entire signal chain. | ||
| + | |||
| + | |||
| + | [[Image:sec6.jpg|600px]] | ||
| + | |||
| + | -[https://www.guitarmasterclass.net/guitar_forum/index.php?act=attach&type=post&id=38222 Here] is the actual patch all of this is pulled from. | ||
| + | |||
| + | |||
| + | Let's break this down. | ||
| + | |||
| + | '''PARAMETRIC EQ''' (Variable Equalizer, Knobs instead of Sliders)<br> | ||
| + | -I've stacked 2 parametric equalizer units here. To see what each one is doing, download the patch and turn each unit off then back on. You can hear right away the impact on the tone. I"m using them to cut out some "Mud" and to limit the frequency range to about 11khz. | ||
| + | |||
| + | '''DIGITAL DELAY''' (Digital version of a Delay/Echo Unit)<br> | ||
| + | -I"m again stacking 2 units here. I'm using short delay times on both which creates very little "echo" effect. Primarily, I"m using them for tone shaping to thicken things up. Again, turn them off and play, then turn them back on to hear the impact on tone. | ||
| + | |||
| + | '''SPRING REVERB''' (Based on Vintage Spring Reverb Unit)<br> | ||
| + | -This is an emulation of a vintage reverb unit that actually used a physical spring to create the reverb effect. It creates a very smooth, analogue sounding reverb. I'm adding just a pinch. | ||
| + | |||
| + | '''PLATE REVERB''' (Based on Vintage Plate Reverb Unit)<br> | ||
| + | -Also based on a Vintage unit, this reverb simulates a unit that originally used a physical metal plate to create the reverb effect. I'm using it to create a "room reverb" sound. In other words, I'm making it sound like the guitar cabinet is in a large studio room. This gives is a classic Metal Sound. | ||
| + | |||
| + | '''IN CONCLUSION''' | ||
| + | |||
| + | In conclusion, I hope that this thread has been useful in helping you to understand how I build my patches and hopefully to understand how you can build better patches. Download the patch from this post. Modify it, save it as your own patch. Use it as a template. It makes a great starting point __IPBWIKI_IMG_HTTP__www.guitarmasterclass.net/guitar_forum/style_emoticons/default/smile.gif__IPBWIKI_IMG_HTTP_END__ '''Feel free to post your results to this thread!!! I'd love to hear them!!''' | ||
| + | |||
| + | |||
| + | [https://www.guitarmasterclass.net/guitar_forum/index.php?showtopic=52594 Forum Thread] | ||
Current revision
SECRETS OF BUILDING KILLER TONE IN SOFTWARE!
(Overloud TH2)
An article by Todd Simpson - Forum Thread
Contents |
PART 1 of 4
You ever wonder why it sounds amazing when some folks make patches in guitar plugins? And sometimes it sounds less than amazing when other folks do it? There are some tips that will help get you towards TONE NIRVANA without taking endless hours away from your practice time!!!
I"m going to break down on patch and you can use these techniques in ANY PROGRAM that contains basic effects. If the program you are using does not contain effects, time to grab one that does ![]() The usual suspects are guitar rig free amplitude free, sgear demo, TH2 demo, (I'm not going to mention lepou as it's without effects) so let's dig in!
The usual suspects are guitar rig free amplitude free, sgear demo, TH2 demo, (I'm not going to mention lepou as it's without effects) so let's dig in!
Step 1. BEFORE YOU HIT YOUR AMP/HEAD!!!
-Take a look at the screen grab above. Here is what's happening in it.
THE SIGNAL CHAIN
PARAMETRIC EQ (Variable Equalizer, Knobs instead of Sliders)
- The reason to put this FIRST in your chain is to shape the tone BEFORE it hits any other processing. Look at the numbers in red in the unit. I"m boosting a bit at 742hz which gives things punch and cutting/removing a bit at 155hz which is where all the HORRIBLE MUD lives.
VARIMU COMPRESSOR (A very pricey compressor that you can read more about at this link http://www.manley.com/mslc.php)
-Look at the numbers in red. Very low "compression ratio" with a bit of "sustain". Essentially I'm using the compressor as a sort of booster so that I don't have to burn out my picking hand and it helps drive the gain.
GATE EXPANDER ( Just a fancy Noise Gate really.)
-Both of them are there just to clean up the signal.
TUBE NINE ( A Tube Screamer Overdrive clone.)
-Just like a Tube Screamer, it's there to act as a preamp and give more signal to the Amp/Head so that the drive section has more to work with and as a result, sounds MEANER!
CHR-2 (Clone of a BOSS Stereo Chorus unit.)
-Just a pinch of stereo chorus helps the tone sound big and wide and thick.
And that's it!!! Next time, THE AMP STAGE!!!
PART 2 of 4
THE PRIMARY GAIN STAGE
Let's look at the AMP/HEAD gain stage. There are many ways to skin this particular cat, but here is a good place to start ![]()
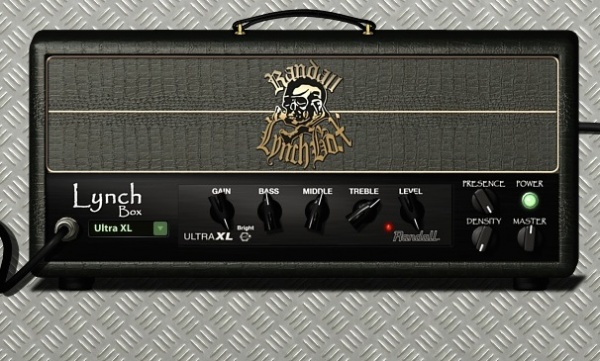
I'm using one of my fave amp heads in TH2. The "LYNCHBOX" from RANDALL. It's very versatile as it's a modular head. You can select any one of a number of different preamps for it from a drop down. As you can see, I'm using the "ULTRA XL" preamp which is based on the legendary ULTRA XL Module that is no longer made and much sought after. Which is why I love accurate software sims ![]()
Let's look at the settings.
PRE-AMP SETTINGS (mostly eq decisions here, trust your ears!)
-These are the settings for the Ultra XL Module Only
GAIN: Gain is roofed smile.gif Of course.
BASS: Bass about half but play with it and tweak to taste.
MID: Mids about the same, tweak to taste.
TREBLE: Treble a bit on the plus side to add bite to pick strikes and BRIGHT switch is on.
LEVEL: is roofed which is just the preamp level. The master level controls the actual power amp that is in charge of volume.
AMP SETTINGS
-These are the settings for the Amp Section Only
PRESENCE: Roofed to maximize the eq decisions.
DENSITY: Zero. It can oversaturate the bass response pretty quickly so be careful.
MASTER: About half but push it till it works ![]()
The AMP STAGE is "FUN" stage IMHO, as you basically pick an amp you like and start turning knobs til your ears tell you that you've gotten it right. There are no digital readouts, no compression ratios, just knobs and switches the way God intended :9
Next Up!!!! Something a bit more technical. THE CAB/MIC STAGE!!!!
Part 3 of 4
GUITAR CABS & MICS
In PART III we are diving in to the wonderful world of Guitar Cabinets and Microphones ![]() Much of this info will translate in to the real world so hang tight!!!
Much of this info will translate in to the real world so hang tight!!!
CHOOSING YOUR WEAPON!
Choosing your speaker cabs is a crucial part of building your tone. If you have not done so, try to load each and every speaker cabinet and play a bit to see what each sounds like. Each has their own character. For this example, I'm going to use the
RANDALL George Lynch "Lynch Box" Cab.
and two Microphones. The AMERICAN 52 and AMERICAN 57. First up! The cab. Then we will talk mics.
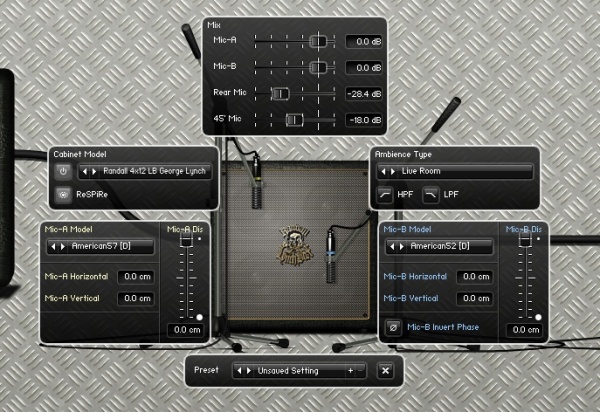
If you double click on the cabinet in TH2, you get the pop up "contextual menu" that you see in the screen grab above. This is the SECRET SAUCE to making your tone sound like a real guitar in a nice room with nice mics, vs a fizzy/buzzy/boomy mess ![]() So tread easy, but with purpose
So tread easy, but with purpose ![]() Let's go through the settings.
Let's go through the settings.
CABINET MODEL:
This dropdown menu is where you pick your cab. Try them all! Each has it's own vibe. The best part is that you can mix and match. I typically use 2 cabs in every patch I make. It reduces the fizz/harshness typically associated with software sims in general and smooths out the top end response IMHO. But for now, just pick one you like.
-RESPIRE: The little button labled ReSPIRe is sort of like the loudness button on your stereo. It greatly enhances bass and a bit of treble. It works great when practicing, but you may want to turn it off during mix down as it can overwhelm bass frequencies in a mix.
MIC A MODEL:
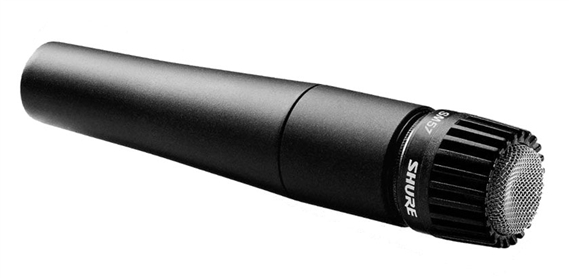
This dropdown menu is where you pick your microphone. There are many to choose from and like the cabs, each is somewhat unique in terms of sound. Try them all and see which ones you like best. You get two mics per cab so finding complimentary pairs is a must. For my MIC A I'm using the American57 which is a simulation of the classic SHURE SM57.
-MIC PLACEMENT: Once you select your mic, click and drag it around until you find a placement that you like.
AMBIENCE TYPE
This dropdown allows you to give a little "ambience" to your tone. E.G. the sound of the room. So it let's the overall tone sound like it was recorded in a nice studio setting. Imagine the large drum room at a pricey studio with your amp sitting in the middle turned all the way up. ![]()
MIC B MODEL:
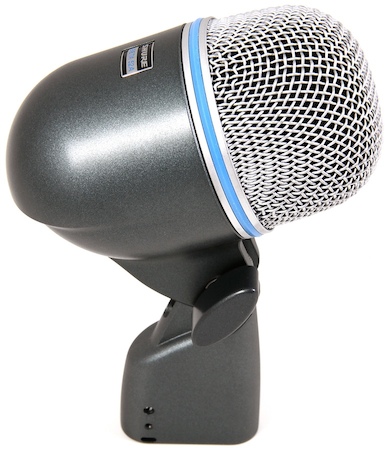
This is the dropdown for your second mic. The second mic should compliment the first. You will learn this by trial and error and by reading about it on the web/seeing vids etc. Certain mics work well together, some don't. I"m using a American52 which is a simulation of a SHURE SM52. This is typically used to mic Kick Drums and Bass Guitar, but I LOVE using it for guitar cabs along with a SM57. It grabs the lower range that the 57 just can't get.
MIX:
This is sort of like a mini mixing board right here inside the plugin ![]() Handy eh? Here you can control and blend the level of both mics. Also, you get a "Rear Mic" which is just to bring up the bass really as it's micing the back of the cab. Also, you get a free 45 degree mic which can add punch. You can put both of these at zero or mix them in to taste.
Handy eh? Here you can control and blend the level of both mics. Also, you get a "Rear Mic" which is just to bring up the bass really as it's micing the back of the cab. Also, you get a free 45 degree mic which can add punch. You can put both of these at zero or mix them in to taste.
Once you are done tweaking, SAVE YOUR PRESET!!! ![]()
NEXT UP!!!! The wonderful world of POST PROCESSING!!
Part 4 of 4
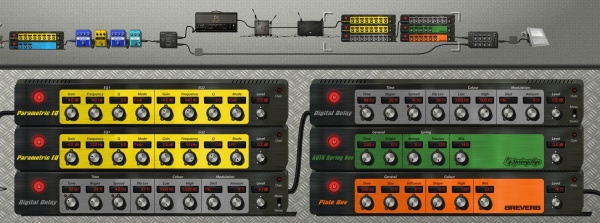
Now for our final installment. POST PROCESSING!! This is what happens AFTER the AMP/HEAD and Mic/Cabinet decisions. Here is a screen grab of the post processing rack and the entire signal chain.
-Here is the actual patch all of this is pulled from.
Let's break this down.
PARAMETRIC EQ (Variable Equalizer, Knobs instead of Sliders)
-I've stacked 2 parametric equalizer units here. To see what each one is doing, download the patch and turn each unit off then back on. You can hear right away the impact on the tone. I"m using them to cut out some "Mud" and to limit the frequency range to about 11khz.
DIGITAL DELAY (Digital version of a Delay/Echo Unit)
-I"m again stacking 2 units here. I'm using short delay times on both which creates very little "echo" effect. Primarily, I"m using them for tone shaping to thicken things up. Again, turn them off and play, then turn them back on to hear the impact on tone.
SPRING REVERB (Based on Vintage Spring Reverb Unit)
-This is an emulation of a vintage reverb unit that actually used a physical spring to create the reverb effect. It creates a very smooth, analogue sounding reverb. I'm adding just a pinch.
PLATE REVERB (Based on Vintage Plate Reverb Unit)
-Also based on a Vintage unit, this reverb simulates a unit that originally used a physical metal plate to create the reverb effect. I'm using it to create a "room reverb" sound. In other words, I'm making it sound like the guitar cabinet is in a large studio room. This gives is a classic Metal Sound.
IN CONCLUSION
In conclusion, I hope that this thread has been useful in helping you to understand how I build my patches and hopefully to understand how you can build better patches. Download the patch from this post. Modify it, save it as your own patch. Use it as a template. It makes a great starting point ![]() Feel free to post your results to this thread!!! I'd love to hear them!!
Feel free to post your results to this thread!!! I'd love to hear them!!
Categories: Gear | Theory
