Caelumamittendum - Dark Light Soloing SI Lesson
Dark Light Soloing
Hey there everybody,
You must surely already know me, but for those of you who don't:
My name is Benjamin, I live in Copenhagen, Denmark, and have been playing guitar on and off for 5-6 years. I almost neglected it completely during my 3 years of...ehr... "high school", but started again this summer. Haven't fully gotten to the point of practicing regularly that I wanted, but I'm trying to work on that.
This is a lesson based on the solo I did for the "Dark Light" collaboration by Nemanja. I thought I would make a lesson out of it.
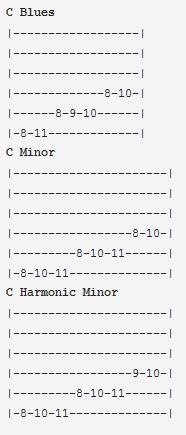
As you might have read in the collaboration thread, it is in the key of Cm. I use both the C blues scale, the C minor scale and the C harmonic minor. Those three follow here:
My guitar is tuned to the regular EADGBE.
Contents |
Main video
Video 1
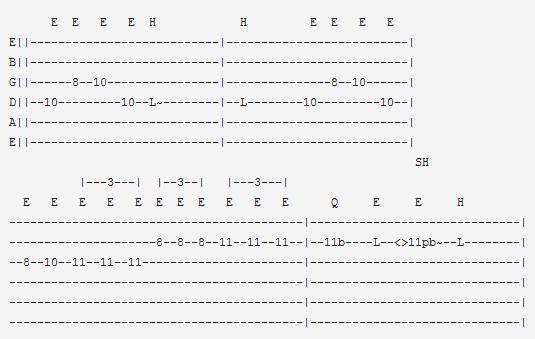
This first bar uses a typical and easy apply-able intro lick using the pentatonic notes from the C minor pentatonic. The first lick comes two times, but the second time around we add the blue note of the C blues scale, 11th fret on the G string, note F#. Notice how the first part is played using eighth-notes, where as we end the lick with playing 8th-note triplets leading into a bend from the 11 fret to the 13th, or in other words from Bb to C.
Video 2
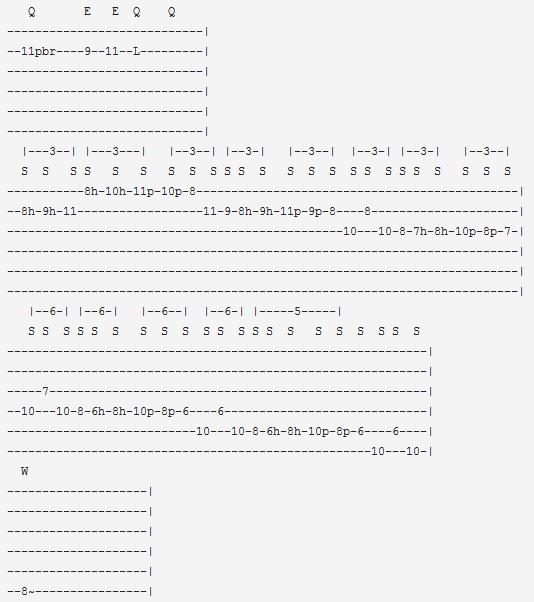
You might recognize this lick from the GMC SI lick of the day. We start out on the bend note from the previous video, bend from Bb to C. I play the pre-bend note and release it, play the 9th fret on the B-string and then the 11th fret, note Bb again. Then leading into a more advanced descending lick. It is not exactly as in the GMC SI Lick of the day, but more or less like it. It is note really meant to be played strictly as noted in the tabs, note-value wise, but just know where you start from and where you end and cram that into the space of 2 bars.


